網頁

2016年4月2日 星期六

PlayOnLinux 4.2.2 --- How to correct the Chinese Font of the PlayOnLinux with Wine 1.9.6(x86) on Ubuntu/Lubuntu 14.04 x64

The PlayOnLinux (# 1) is a front-end of the wine and it can let us easily install some Windows software or Games on Linux. When I install Evernote 5.8.x (# 2) on Lubuntu 14.04 and open this program, I find out some Chinese font cannot be showed.


For realizing this problem, I search some information by Google and understand what happens. That is "Tahoma" is the default font of the Wine but it can not display the Chinese font normally.

How to resolve it? To install the Chinese font and add some registry value.
In the moment, I will download the Google Android "Droid" font and save the "DroidSansFallback.ttf" as the "~/.wine/drive_c/windows/fonts/" directory.

To open a file with ".reg" extension and add some registry key/value (# 3) in the content. It is import to save this file with "Big5" codec otherwise it will fail when import this reigstry file later.
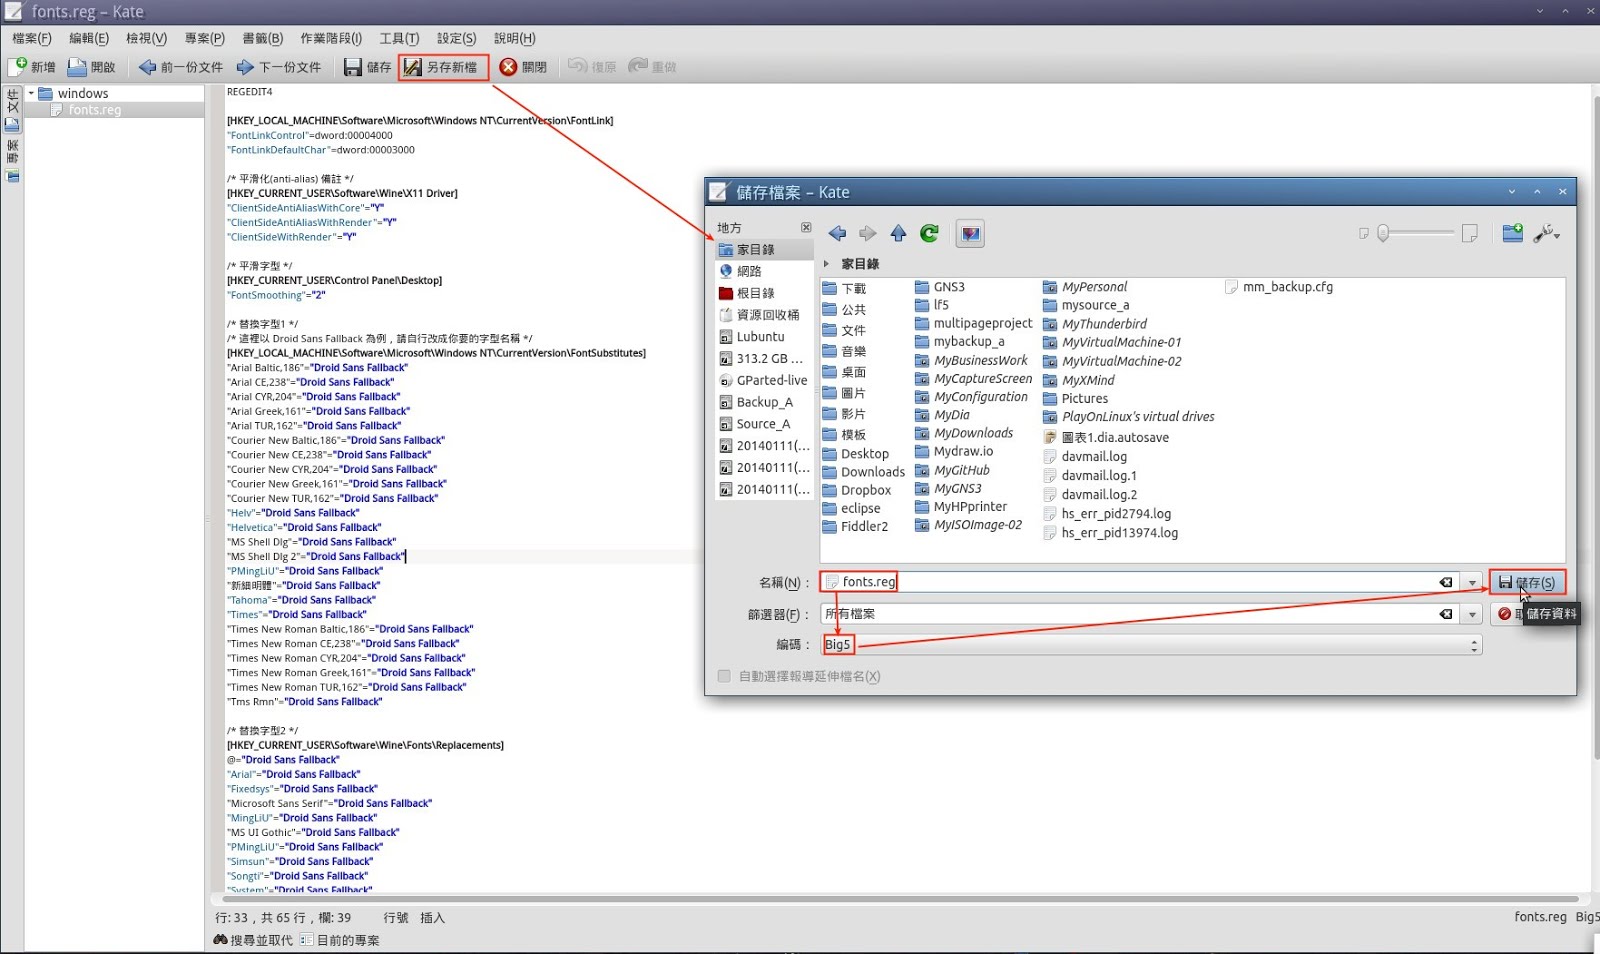
In Wine tab, click the Registry Editor button

Once open up the Wine registry editor, click the Registry menu next to select the Import Registry File...
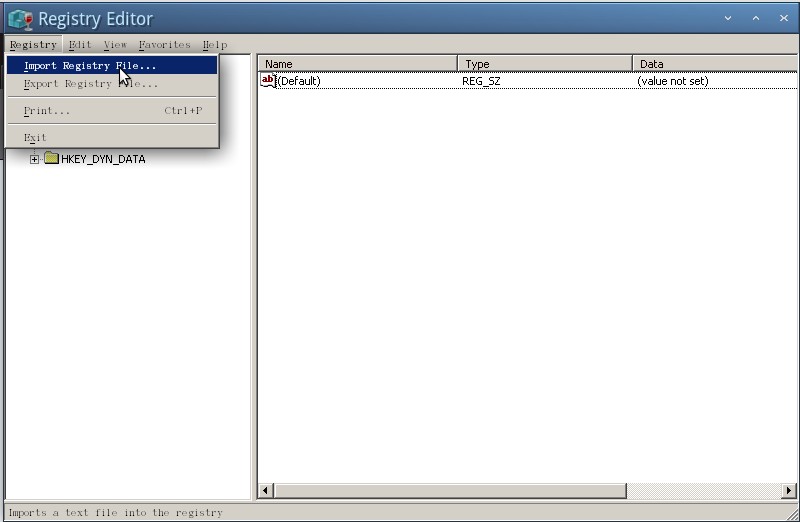
So does that the HKEY_LOCAL_MACHINE\Software\Microsoft\Windows NT\CurrentVersion\FontSubstitutes parameter will be changed as follows:

Re-open the Evernote again, we will see the display font is normal now.

Reference:
(# 2). After install Evernote 5.9.x version, it just can be viewed but no write function.
(# 3). The following content refer to [教學] 圖解 wine 入門 [論壇 - Ubuntu 文件資源]
REGEDIT4

[HKEY_LOCAL_MACHINE\Software\Microsoft\Windows NT\CurrentVersion\FontLink]
"FontLinkControl"=dword:00004000
"FontLinkDefaultChar"=dword:00003000

/* 平滑化(anti-alias) 備註 */
/* 如果覺得開了之後字體難看,把三個 Y 改成 N,有些字型要開啟平滑化才好看 */
[HKEY_CURRENT_USER\Software\Wine\X11 Driver]
"ClientSideAntiAliasWithCore"="Y"
"ClientSideAntiAliasWithRender"="Y"
"ClientSideWithRender"="Y"

/* 平滑字型 */
[HKEY_CURRENT_USER\Control Panel\Desktop]
"FontSmoothing"="2"

/* 替換字型1 */
/* 這裡以 Droid Sans Fallback 為例,請自行改成你要的字型名稱 */
[HKEY_LOCAL_MACHINE\Software\Microsoft\Windows NT\CurrentVersion\FontSubstitutes]
"Arial Baltic,186"="Droid Sans Fallback"
"Arial CE,238"="Droid Sans Fallback"
"Arial CYR,204"="Droid Sans Fallback"
"Arial Greek,161"="Droid Sans Fallback"
"Arial TUR,162"="Droid Sans Fallback"
"Courier New Baltic,186"="Droid Sans Fallback"
"Courier New CE,238"="Droid Sans Fallback"
"Courier New CYR,204"="Droid Sans Fallback"
"Courier New Greek,161"="Droid Sans Fallback"
"Courier New TUR,162"="Droid Sans Fallback"
"Helv"="Droid Sans Fallback"
"Helvetica"="Droid Sans Fallback"
"MS Shell Dlg"="Droid Sans Fallback"
"MS Shell Dlg 2"="Droid Sans Fallback"
"PMingLiU"="Droid Sans Fallback"
"新細明體"="Droid Sans Fallback"
"Tahoma"="Droid Sans Fallback"
"Times"="Droid Sans Fallback"
"Times New Roman Baltic,186"="Droid Sans Fallback"
"Times New Roman CE,238"="Droid Sans Fallback"
"Times New Roman CYR,204"="Droid Sans Fallback"
"Times New Roman Greek,161"="Droid Sans Fallback"
"Times New Roman TUR,162"="Droid Sans Fallback"
"Tms Rmn"="Droid Sans Fallback"

/* 替換字型2 */
[HKEY_CURRENT_USER\Software\Wine\Fonts\Replacements]
@="Droid Sans Fallback"
"Arial"="Droid Sans Fallback"
"Fixedsys"="Droid Sans Fallback"
"Microsoft Sans Serif"="Droid Sans Fallback"
"MingLiU"="Droid Sans Fallback"
"MS UI Gothic"="Droid Sans Fallback"
"PMingLiU"="Droid Sans Fallback"
"Simsun"="Droid Sans Fallback"
"Songti"="Droid Sans Fallback"
"System"="Droid Sans Fallback"
"Tahoma"="Droid Sans Fallback"
"Terminal"="Droid Sans Fallback"

/* 取代字型 */
"Microsoft Sans Serif"="DroidSansFallback.ttf,Droid Sans Fallback"
"SimSun"="DroidSansFallback.ttf,Droid Sans Fallback"
"Tahoma"="DroidSansFallback.ttf,Droid Sans Fallback"
"PMingLiU"="DroidSansFallback.ttf,Droid Sans Fallback"
"Lucida Sans Unicode"="DroidSansFallback.ttf,Droid Sans Fallback"

2016年2月28日 星期日

VMWare Workstation 12 Pro --- How to repair the vmdk disk if the defragmentation fail

I am not sure why the defragment fail when want to defrag the VMDK disk on the VMWare Workstation. It just tell me that the specified vritual disk needs repair!
image
How to do it?
As before, I will please Google help to search the related information for resolving this problem. Thanks Google let me to find out one KB on the VMWare Official Web. That is KB --- Repairing a virtual disk in Workstation (2019259)

According to this content, it clearly teach us to do the following command
# /usr/bin/vmware-vdiskmanager -R <path of the vmdk(virtual disk)>
image        Note: Where < path of the vmdk(virtual disk)> is the folder path to the virtual disk that appeared in the error.

Once the above process finish successfully, we can do the defragment virtual disk now.
image

2016年1月9日 星期六

DDNS --- How to register & configure DDNS on FreeDNS/DD-WRT AP

If we don’t buy any Domain Name and use the dynamic public IP such as ADSL, how to let Internet user access the personal system as website or mail?  Maybe DDNS can resolve this problem because it will automatically update the dynamic public ip so that the dns name will never been changed even after the dynamic ip is changed as AP reboot or power on.

Due to the personal AP with DD-WRT firmware has DDNS feature, I will choose the FreeDNS.afraid.org to register a free DDNS service for me.
How to do it?
Register FreeDNS and create an A record
To create an account on freedns.afraid.org and verify it by activating the received email, we will visit this Web page and click [ Mail Menu] link in left panel.
image
The signup page will show up. Please key in UserID and password next to click Login button
image
Click [ Subdomains ] link
image
Click Add a subdomain link
image
In the Add a new subdomain diaglog, select a type such as “A”, define a subdomain such as “dwlab”, pick one of the available domains such as “mooo.com(public)”, enter the current WAN IP of AP in the Destination field and leave TTL & Wildcard setting as the default next to click Save! buttonimage
So does that the new & free subdomain such as “dwlab.mooo.com” has already been added.
image
To manually set the DNS for the subdomain to the WAN IP of the AP, please Click [Dynamic DNS] –> Direct URL link
image
The explorer will be opened. Please select some string as follows mark and copy it to the system’s clip board.
image
Set up DDNS on AP (# 1)To log in to the DD-WRT AP, select “freedns.afraid.org” as the DDNS service, enter the User Name and Password that belong to the freedns.afraid.org account, enter the full suddomain such as “dwlab.mooo.com” + comma such as “,” + paste the unique udpate token in the Hostname field
imageOnce click Apply Settings button, we can see messages appear that verify the settings are working at the bottom of the DDNS status.

So do that we can ping this subdomain now.
image
Reference
(# 1)    dd-wrt Dynamic DNS

2016年1月3日 星期日

hMailServer 5.6.4 --- How to install hMailServer with SQL Server 2016 CTP 3.1 on Windows Server 2016 TP4

If we want to find a free, easy setup, email server on windows platform, maybe we can choose an open source product “hMailServer”.
It support the common email protocols as IMAP, SMTP, POP3 and its license is under AGPLv3 (# 1) that it is free in most commercial scenarios.

For using hMailServer, we need to realize what is the system requirements at first next to install/configure/active it.
According to the latest document in hMailServer Official Web, the current version as hMailServer 5.6 can be confirmed on Windows XP with Service Pack 3, Vista, 7, 2003, 2008 and 2012.
It also depends on Database server as built-in a light-weight version of MSSQL or select the other database engine as MySQL 4 or 5, Microsoft 2000 or 2005 or 2008, PostgreSQL 8 by officially being tested.

After installing the SQL Server 2016 CTP 3.1 (# 2), we will download the latest version “hMailServer” from Official Web.
image
and double click this file so that the setup wizard will pop up. Click Next > to continure for installing hMailServer.
image
Due to the server and management tool will install on the same computer, we will select all check box next to click Next > button
image
We will use external database engine so that choose this option next to click Next > button.
image
To create a folder for allocating the hMailServer component together (# 3) so that define a name next to click Next > button
image
Please define a password for managing the hMailServer system in the future.
image
In the installation process, we need to enter this password for initializing hMailServer database at the first time.
image
In the hMailServer database setup wizard, click Next > button for beginning to create a new hMailServer database now.
image
To select “Create a new hMailServer database” option next to click Next > button.
image
Select “Microsoft SQL Server”  option next to click Next > button.
image
Enter the server connection information as database server address, database name, authentication and so on next to click Next > button
image
Due to the hMailServer service is dependent on a database service on this compuer, we need to set the hMailServer service dependency as “SQL Server (MSSQLSERVER)(MSSQLSERVER)” for ensuring the database service is running before hMailServer is started.
image
To click Close button to complete the hMailServer database setup wizard.
image
Also click Finish button to complete the hMailServer setup wizard and launch “hMailServer Administrator”.
image
Select the Host name and hMailServer Username next to click Connect button
image
Of course, need to enter the hMailServer pasword.
image
Until now, the hMailServer system has already been finished the installation process.
image
Reference
(# 1)   Affero General Public License & 因應網路時代與雲端應用而生的 AGPL-3.0 授權條款
(# 2)   Install SQL Server 2016 from the Installation Wizard (Setup)
(# 3)   When we do it, the hMailServer executable program will be located under this folder.
image

Windows Server 2016 --- How to resolve the Edge Browser cannot be explored by Built-in Administrator account on Windows Server 2016 TP4

If we login the built-in Administrator account and navigate Edge Browser on Windows Server 2016 TP4, we will get the error message “Microsoft Edge can’t be opened using the Built-in Administrator account.  Sign in with a different account and try again
image_thumb6
How to get around this message?Open the local security policy on Windows Server 2016 TP4 by typing secpol.msc at the command prompt.

In the local security policy dialog, expand Security Settings –> Local Policy –> Security Options and set the policy “User Account Control Admin Approval Mode for the Built-in Administrator account” to Enabled.
image_thumb7
AS-IS
image_thumb1
TO-BE
image_thumb3
To restart the OS for taking effect the change so that the Edge Browser can be opened by Administrator account now
image_thumb9

2015年12月26日 星期六

ZeroShell 3.4.0 ---- How to quickly install ZeroShell on VMware "vmdk" disk.


I want to build a Router device on virualization environment for message exchange and hope it is simple and easy to create/setup one. In Google search, I find out an open source software “ZeroShell” and it is comfortable for installing and managing this.
ZeroShell is Linux Router with more feature as router, firewall, Radius and so on. Although someone has already share the installation methond on Internet, I just think whether it can convert image file so that don’t need to do the steps too much.
How to do it?

Download ZeroShell Image
Go to the ZeroShell Official Web and download the latest img file.imageExtract xxx.img.gz file to xxx.img next to confirm whether exist a QEMU-IMG tool. (# 1)

Convert .img to .vmdk image
If there is ever install qemu-utils package on debin/ubuntu system, we can directly by using the qemu-img convert –f raw xxx.img –O vmdk xxx.vmdk command (# 2)imageIf it is installed on windows platform, we will do the qemu-img convert –O vmdk xxx.img xxx.vmdk command
image
When the vmdk file is created, we will begin to create a New Virtual Machine on wmware production as wmware workstation.
In the configuration wizard, we can select the following parameter:
      Guest Operation System: Linux
      Version: Other Linux 3.x kernel 64-bit
      Memory: large than default value 384 MB
      Network Connection: at least large than two interface
      Virtual Disk Type: IDE
      Disk: Use an existing virtual disk as the converted vmdk file
It is important to chose the boot mode is BIOS, not EFI mode !!!
Once the setting is completed, we can start this VM and beging to setup the IP Address and Default Gateway on console mode now.
image
Reference:
(# 1)
   In Ubuntu/Lubuntu Trusty 14.04, we can install QEMU-IMG tool by using the sudo apt-get install qemu-utils command
image          
           In Windows Platform, we can download/install QEMU binaries for Windows
image
(# 2)   “qemu-img” Disk Image Utility 

2015年11月29日 星期日

KVM 2.0.0 --- How to install KVM and Virtual Machine Manager on Lubuntu 14.04

In Linux environment, we have other choice to create virtual machines besides VirtualBox or VMware. That is KVM.
KVM (Kernel-based Virtual Machine) is a virtualization extension for the Linux Kernel. We can use KVM to run both Windows and Linux in virtual machines.

The following guide will explains how to install and use KVM for creating and running virtual machines on an Lubuntu 14.04 LTS Desktop.

  1. Preprequisite Check
KVM will work only if the CPU is suitable for Intel VT or AMD-V hardware virtualization. We can run the sudo egrep -c '(vmx|svm)' /proc/cpuinfo command to find whether the cpu supports virtualization features
※ The 0 value means the processor doesn't support VT-x extensions, but values greater than 1 mean it does.


Check the hardware compatible by using sudo kvm-ok command (# 1)

To see what kernel is 32-bit or 64-bit by using uname -ri command (# 2)
※ In 32-bit kernel, the memory size of a VM will be limited to 2GB and only can install 32-bit guest VM.

  1. Install KVM and other packages
    1. By doing sudo apt-get update command, downloads the package lists from the repositories and "updates" them to get information on the newest versions of packages and their dependencies.

    1. Install Qemu package
      1. For enabling KVM hypervisor, we can install Kernal based Virtual machine(qemu-kvm) and CPU emulator(qemu) by using the sudo apt-get install qemu-kvm qemu command.

    1. Install libvirt library
      1. For interacting with the virtualization capabilities of recent versions of Linux, we can install libvirt package by using sudo apt-get install libvirt-bin command

    1. Install network utility
      1. For setting up networks on VM, we can install the bridge-utils package by using sudo apt-get install bridge-utils command

    1. Install graphical interface
      1. For managing KVM based virtual machines, we can install Virt-Manager(Virtual Machine Manager) graphical tool by using the sudo apt-get install virt-manager command.

※ On Lubuntu/Ubuntu, we can directly install another tool “ubuntu-vm-builder” that can be used for provisioning Ubuntu builds by using the sudo apt-get install ubuntu-vm-builder command.


  1. Delegate permission
In the moment, only the root user and users in the libvirtd group have permission to use KVM virtual machines. So that we have to add the specifial user account to the libvirtd group by using the sudo adduser libvirtd command
or using sudo adduser ‘id -un’ libvirtd command for logon account.

After do it, we have to log off and log on so that the user can run virtual machine now.

  1. Verify Installation
    1. Verify whether the KVM daemon is up and running by using the lsmod | grep kvm command.
    1. Check kvm daemon version by using the kvm --version command
    1. Verify whether the libvirt-bin daemon is up and running by using the sudo service libvirt-bin status command.
    1. Check libvirt-bin daemon version by using the libvirtd --version command
    1. Check whether kvm and libvirtd exist in /etc/group by using sudo cat /etc/group command
    1. Check whether libvirt-qemu and libvirt-dnsmasq exist in /etc/passwd by using sudo cat /etc/passwd command
    1. Check KVM installation status by using the sudo virsh -c qemu:///system list command

  1. Network Setup (virbr0 NAT interface)
The default network mode is the User mode and uses a predefined virbr0 (# 3) brigge which is NAT routed to the guest computer. The NAT routing uses the kernel's ip_forwarding feature and iptables.

To see the default User network setting by using the sudo virsh net-dumpxml default command
When the libvirt default network is running, you will see an isolated bridge device. This device explicitly does *NOT* have any physical interfaces added, since it uses NAT + forwarding to connect to outside world.

  1. Create a new VM
Once the installation completes, we can lanuch Virtual Machine Manager in GUI mode by using the sudo virt-manager command. (# 4)
To right-click the localhost(QEMU) and click New in menu, it will start a wizard for creating the new virtual machine.

Reference:
(# 1)     If we run the kvm-ok command, we can realize whether VT-x funciton is switched on and need to enable VT-x in the BIOS setting.
If this commad never be installed, we can install cpu-checker package by using the sudo apt-get install cpu-checker command to help evaluate the CPU feature.

(# 2)    Because KVM is not compatible with Xen, make sure Linux is not running a Xen kernel by running the uname -a command.
If you see output similar to “2.6.18-164.el5Xen”, a Xen kernel is running and must be stopped or remove before install KVM.

(# 3)   To disable virbr0 NAT interface by using the following command
# virsh net-destroy default
# virsh net-undefine default
# service libvirtd restart

(# 4)   If you don't want to run as root, the user you want to use needs to have rw access to /dev/kvm
(# 5)   After installing the libvirt and its GUI front-end virt-manager, the defalut location of VM image will be created on /var/lib/libvirt/images directory.

Since 2010 Design by Davidwa
©Copyright Davidwa Inc. All rights reserved.