1.Teach you to set trunk between Router and Switch
2.Teach you to set VLAN on Router for different VLAN segment
After doing the above steps, the traffic in different VLAN segment can exchange message.
Today, we will expand Switch and PC device and verify the VLAN function. This Lab will be similar with the production environment and can satisfy the practice necessity.
The network diagram is as follow:
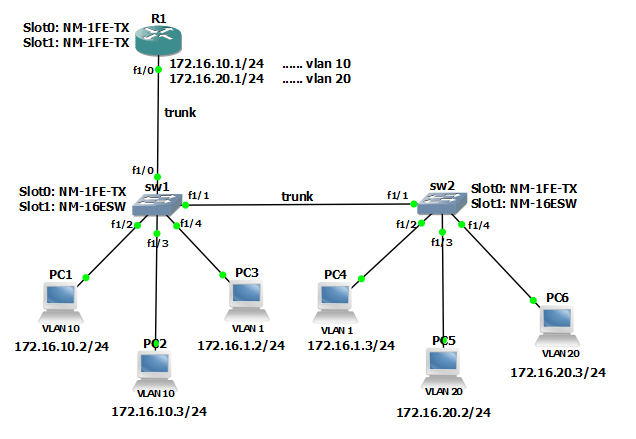
In this Lab, we want to let the package of vlan 10 and vlan 20 can exchange but vlan 1 fail with vlan 10 or vlan 20.
How to do it now?
(1).Configure Switch in the left-panel
Enable configuration and change hostname

Set parameter on console terminal line

Add vlans to the vlan database

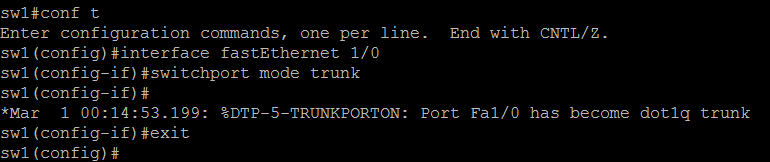
Configure a trunk port for Router
Configure a trunk port for sw2

Configure access ports 2~3 and vlan 10 for PC1 & PC2

Verify vlan setting

Building configuration

(2).Configure Switch in the right-panel
Enable configuration
Set parameter on console terminal line

Add vlans to the vlan database

Configure a trunk port for sw1

Configure access ports 3~4 and vlan 20 for PC5 & PC6

Verify vlan setting

Building configuration
(3).Configure Router
Enable configuration

Set parameter on console terminal line

Enable the fa1/0 interface
Configure Subinterfaces vlan and ip


Verify vlan and ip setting

Building configuration
(3).Set network parameter on PC1 ~ PC6
(4).Test IP Connectivity by ping command
on PC1, we can ping vlan 10 & 20, but vlan 1 fail


on PC3, we can ping vlan 1, but vlan 10 & 20 fail


on PC5, we can ping vlan 10 & 20, but vlan 1 fail


So the result that the procedure is proved is right in this lab now.
- Configure PC1 (vlan 10)
IP address: 172.16.10.2 Subnet Mask:255.255.255.0 Gateway:171.16.10.1
- Configure PC2 (vlan 10)
IP address: 172.16.10.3 Subnet Mask:255.255.255.0 Gateway:171.16.10.1
- Configure PC3 (vlan 1)
IP address: 172.16.1.2 Subnet Mask:255.255.255.0 Gateway:171.16.1.1
- Configure PC4 (vlan 1)
IP address: 172.16.1.3 Subnet Mask:255.255.255.0 Gateway:171.16.1.1
- Configure PC5 (vlan 20)
IP address: 172.16.20.2 Subnet Mask:255.255.255.0 Gateway:171.16.20.1
- Configure PC6 (vlan 20)
IP address: 172.16.20.3 Subnet Mask:255.255.255.0 Gateway:171.16.20.1
(4).Test IP Connectivity by ping command
on PC1, we can ping vlan 10 & 20, but vlan 1 fail


on PC3, we can ping vlan 1, but vlan 10 & 20 fail


on PC5, we can ping vlan 10 & 20, but vlan 1 fail


So the result that the procedure is proved is right in this lab now.


