網頁

顯示具有 技術---VMware Workstation 標籤的文章。 顯示所有文章

2018年1月14日 星期日

VMware Workstation 14.0.0 --- How to convert a virtual disk from growable to preallocated on Lubuntu 16.04

In general, we create a virtual disk with growable type for saving the disk space on vmware environment. For performance thought, maybe need to change the disk type for reducing the count of the defrage/compact disk.
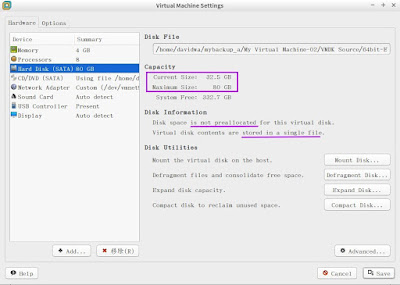
By the virtual machine settings, we can know whether the disk is preallocated or not in the disk information.

Once decide to do this, we have to shut down the virtual machine because the disk can’t be converted if it’s powered on or suspended.
To convert the virtual disk by using the following command
$ vmware-vdiskmanager -r < original disk > -t < type > < target disk >
Note:
1). The location is the sames as one.
2). In using the -t flag, VMware virtual disk (vmdk) types has the following choice.
  • 0 : single growable virtual disk (single .vmdk file)
  • 1 : growable virtual disk split in 2Gb files (multiple 2GB files)
  • 2 : single preallocated virtual disk (single file)
  • 3 : preallocated virtual disk split in 2Gb files (multiple 2GB files)
  • 4 : preallocated ESX
  • 5 : compressed for streaming


When successfully finish the convert, we need to replace the original Disk file with the new disk. The action flow is as follows:
AS-IS
TO-BE
Now we can boot it normally.

2016年2月28日 星期日

VMWare Workstation 12 Pro --- How to repair the vmdk disk if the defragmentation fail

I am not sure why the defragment fail when want to defrag the VMDK disk on the VMWare Workstation. It just tell me that the specified vritual disk needs repair!
image
How to do it?
As before, I will please Google help to search the related information for resolving this problem. Thanks Google let me to find out one KB on the VMWare Official Web. That is KB --- Repairing a virtual disk in Workstation (2019259)

According to this content, it clearly teach us to do the following command
# /usr/bin/vmware-vdiskmanager -R <path of the vmdk(virtual disk)>
image        Note: Where < path of the vmdk(virtual disk)> is the folder path to the virtual disk that appeared in the error.

Once the above process finish successfully, we can do the defragment virtual disk now.
image

2015年12月26日 星期六

ZeroShell 3.4.0 ---- How to quickly install ZeroShell on VMware "vmdk" disk.


I want to build a Router device on virualization environment for message exchange and hope it is simple and easy to create/setup one. In Google search, I find out an open source software “ZeroShell” and it is comfortable for installing and managing this.
ZeroShell is Linux Router with more feature as router, firewall, Radius and so on. Although someone has already share the installation methond on Internet, I just think whether it can convert image file so that don’t need to do the steps too much.
How to do it?

Download ZeroShell Image
Go to the ZeroShell Official Web and download the latest img file.imageExtract xxx.img.gz file to xxx.img next to confirm whether exist a QEMU-IMG tool. (# 1)

Convert .img to .vmdk image
If there is ever install qemu-utils package on debin/ubuntu system, we can directly by using the qemu-img convert –f raw xxx.img –O vmdk xxx.vmdk command (# 2)imageIf it is installed on windows platform, we will do the qemu-img convert –O vmdk xxx.img xxx.vmdk command
image
When the vmdk file is created, we will begin to create a New Virtual Machine on wmware production as wmware workstation.
In the configuration wizard, we can select the following parameter:
      Guest Operation System: Linux
      Version: Other Linux 3.x kernel 64-bit
      Memory: large than default value 384 MB
      Network Connection: at least large than two interface
      Virtual Disk Type: IDE
      Disk: Use an existing virtual disk as the converted vmdk file
It is important to chose the boot mode is BIOS, not EFI mode !!!
Once the setting is completed, we can start this VM and beging to setup the IP Address and Default Gateway on console mode now.
image
Reference:
(# 1)
   In Ubuntu/Lubuntu Trusty 14.04, we can install QEMU-IMG tool by using the sudo apt-get install qemu-utils command
image          
           In Windows Platform, we can download/install QEMU binaries for Windows
image
(# 2)   “qemu-img” Disk Image Utility 

2014年11月30日 星期日

CentOS 7.0 --- Install Open VM Tools on Guest VM

When I install the WMware Tool on the fresh CentOS 7 minimal version, I get an error message about the bad interpreter /usr/bin/perl command so that the installer script cannot be executed.
ScreenHunter_438The reason is the minimal CentOS installation never installs the Perl package by default.

If the network function is normal, we can execute the yum install perl command to install it from Internet repository.ScreenHunter_449
Or we can install it from local CDROM so that need to mount the CDROM media at first.
ScreenHunter_439next to create a repository configuration file as cdrom.repo in /etc/yum.repos.d/ directory with the following content.
ScreenHunter_447Then use the yum --disablerepo=\* --enablerepo=c7-media install perl commandScreenHunter_448So do that the Perl package will be installed now.ScreenHunter_450
Although we can execute the vmware tools and no any error message as before, another question will show up that tell us the ifconfig command not found.
Next action? We will do another choice to install Open VM tools in CentOS 7 guest.

According to “Guest Operating System Installation Guide”, VMware recommends using the Open VM Tools redistributed by the operating system vendors.
Why?
Open VM Tools is the open source implementation of VMware Tools and consist of a suite of virtualization utilities that improves the functionality, administration, and management of virtual machines on VMware hypervisors.
How to do it?
Install open-vm-tools package (# 1)
Install open source vmware tools by using the yum install open-vm-tools command
ScreenHunter_461
Install open-vm-tools-deploypkg plug-in package (# 2)
Due to this VM will make as a template, we will install the deployPkg Tools plug-in.
At first, we will download all the VMware Public Packaging Public Keys from the http://packages.vmware.com/tools/keys directory by using the wget http://packages.vmware.com/tools/keys/VMWARE-PACKAGING-GPG-RSA-KEY.pub command.
ScreenHunter_465next to import the VMware packaging public keys by using the rpm --import VMWARE-PACKAGING-GPG-RSA-KEY.pub commandScreenHunter_466
we will create a repository configuration file as vmware-tools.repo in /etc/yum.repos.d/ directory with the following content.
ScreenHunter_462
Install deployPkg Tools plug-in by using the sudo yum install open-vm-tools-deploypkg commandScreenHunter_463
Reference
(# 1)   VMware support of open-vm-tools (2073803)
(# 2)   Installing the deployPkg plug-in in a Linux virtual machine (2075048)
(# 3)   We cannot install Open VM Tools and VMware Tools on the same Guest VM as follows.ScreenHunter_470

2014年3月8日 星期六

Ubuntu 13.10 --- How to enable the Share Folders function of Guest VM on VMware Workstation 10

In general, the share folders function will be enabled automatically after installing the VMware tools on the Windows platform. It is a little different status if the Guest VM O.S. is Linux platform. When I install the VMware Tools on Ubuntu 13.10 x64 OS, the share folders function is disabled.ScreenHunter_15How to resolve this problem?
At first, we have to check whether the Share Folders module is loaded now by using the lsmod | grep vwhgfs command.ScreenHunter_03Due to nothing happens, we can try to load this module again by using the modprobe vwhgfs command but the result is “Module vmhgfs not found”.ScreenHunter_04"Maybe the VMware Tools installation fail”,I miss myself. I decide to realize whether other modules about VMware Tools is loaded then by using the lsmod | grep –i vm command.ScreenHunter_05The good news is that some module exist and is loaded normally. So I decide to redo the VMware configuration by using the sudo ./vmware-config-tools.pl command and accept to the default answer when it ask me whether wish to enable the shared folders feature.ScreenHunter_07In the configuring process, we also can enable some feature as “dragging or copying files between host and guest”ScreenHunter_08After finish the above configuration, please reboot VM for the new feature to take effect.

To log on the system and run the lsmod | grep vmhgfs command again, we can find out the Share Folders module is existing and running now.
ScreenHunter_10The Share Folder function has already been opened so that we can add it by triggering the Share Folder wizard.
ScreenHunter_11To switch to the /mnt/hgfs directory so that we can see this Share Folder Name now.
ScreenHunter_12By using the vmware-hgfsclient command, we also know the Share Folder Name will appear in the /mnt/hgfs directory.
ScreenHunter_13In the Guest VM, we can explore and access the “Host” data in this share folder now.
ScreenHunter_14

2013年8月21日 星期三

VMware Workstation Pro 12.x --- Install VMware Tool on CentOS 6.3 x64 or 6.7 x64 minimal version

In the VMware product as Workstation or vSphere, it will be very important that install VMware Tools on any VM Guest for enhancing/improving some function as graphic display and performance, drag and drop operation, shared folder and so on.
How to install VMware Tools on CentOS?
It will be very simple operation if do the related steps as follows:

After power on the VM Guest, we have to click VM –> Install VMware Tools.. in this VM Guest menu.ScreenHunter_02So does that the VMware Tools will be mounted by CDROM device now.

In the next step, we need to create a mount point by executing the command mkdir /mnt/cdrom next to mount this CDROM by doing the command mount /dev/cdrom /mnt/cdromScreenHunter_03Now the system can read-only the CDROM data. In the moment, we will extract the VMware Tools from CDROM to the folder of local disk by using the command tar zxpf /mnt/cdrom/VMwareTools…ScreenHunter_04So does that the VMware Tool source will be accessed now.

To switch to VMware Tool directory as vmware-tools-distrib and execute the command ./vmware-install.pl for installing VMware Tools. (# 1) In the later procedure, we always press Return/Enter key to choose the default setting or configuration.ScreenHunter_05ScreenHunter_06ScreenHunter_07ScreenHunter_08ScreenHunter_10When the above process is successful and never show the warning/error message, we will reboot the system so that the VMware Tools will embed into the Kernel now. (# 2)

To verify the status of VMware Tools by using status vmware-tools command

Reference :
(# 1)   Before execute vmware-install.pl in the CentOS minimal version, please firstly confirm whether ever install gccperlfuse-libs package in the procedure of OS installation.

(# 2)   If update the Kernel or there is new VMware tool version, we have to install VMware Tools again by the above procedure except for uninstalling old version firstly.

2013年4月27日 星期六

VMware Workstation 9.x --- Repair virtual disk when disk defragment fail

The behavior of virtual disk is a little like as the physical disk drive that file, program and unused space dose not continue serial arrangement. It will become fragmented in the duration of working so that will influence read/write performance.
For improving this, maybe we need to defrag virtual disk to rearrange the file and program sometimes. So does that the file will be opened quickly or the program run faster than before.

For this sake, I have to first power off VM and then click Edit virtual machine settings to launch the Virtual Machine Settings. When I select the hard disk entry from the Hardware tab and click the Utilities next to select Defragment in menu,ScreenHunter_01a warning message pop up and tell me that “Defragmentation failed: The specified virtual disk needs repair”.ScreenHunter_02Based on this warning sentence, I search the answer from the VMware KB and it is lucky for me to find out How to do it.ScreenHunter_03On the command prompt to run “vmware-vdiskmanager.exe -R “path of the vmdk file”ScreenHunter_04ScreenHunter_06After redo the above operation for defragment, it will successfully complete now.ScreenHunter_08
Since 2010 Design by Davidwa
©Copyright Davidwa Inc. All rights reserved.