網頁

顯示具有 技術---Windows_Server 標籤的文章。 顯示所有文章

2012年7月14日 星期六

Account Lockout (part 2 of 4)

In Microsoft Download Center, search and download “Account Lockout and Management Tools”
ScreenHunter_01 Jun. 29 10.53Double-click “ALTools.exe” to extract all on 64-bit Windows Server 2008 R2 platformScreenHunter_06 Jun. 29 14.30The related files will be here.
ScreenHunter_07 Jun. 29 14.31
Scenario
One day, someone tell you that her or his account is locked and want to know what happen. In the moment, how to track this status?

By LockoutStatus utility
Right-click “LockoutStatus.exe” next to click Run as administrator in the menu
ScreenHunter_15 Jun. 29 17.10Click File –> Select Target…ScreenHunter_16 Jun. 29 17.11Key locked account name as “test_2” into Target User Name and its domain name as “dw.com” into Target Domain Name.
If need to use the enough AD right, please enable “Use Alternate Credentials” check box and key in the related data as User Name, Password and Domain Name.
ScreenHunter_17 Jun. 29 17.12Now you can know when this account is locked and which DC lock it.ScreenHunter_18 Jun. 29 17.13Right-click this next to click “Open Event Viewer" in menu
ScreenHunter_19 Jun. 29 17.13In Event Viewer, expand Windows Logs and right-click Security next to click “Filter Current Log…” in menu
ScreenHunter_20 Jun. 29 17.16Key in ID numbers as “4625,4740,4771,4772,4777” next to click “OK” button
ScreenHunter_21 Jun. 29 17.18Now you can see all filtered log
ScreenHunter_22 Jun. 29 17.19Open each log to realize which computer trigger the locked status.
ScreenHunter_23 Jun. 29 17.21Maybe we need to log on this computer to realize what reason trigger the locked happen.
According to common causes for account lockouts (reference 3), sometimes we cannot find the root cause event though follow its suggestion.

Reference
(1). Description of security events in Windows Vista and in Windows Server 2008
     or  Description of security events in Windows 7 and in Windows Server 2008 R2
(2). Standalone Utility --- Account Lockout Status (LockoutStatus.exe)
(3). Common Causes for Account Lockouts

<<<   Account Lockout (part 1 of 4)

2012年7月9日 星期一

Set RPC Dynamic Range port on Any Servers

In the DFSR mechanism, it always use RPC Dynamic port to communicate with DC when want to generate the Health Report.
Due to the firewall locates between DFSR Server and DC, so I need to set RPC Dynamic port to fixed port on DC.
How to do it? Add the registry entity,key and value!

Add Registry Entity
By Registry Editor, explore “HKEY_LOCAL_MACHINE\Software\Microsoft\Rpc" and right-click “Rpc" next to click “New", "Key" in menuScreenHunter_15 Jun. 30 16.10Write down “Internet"
ScreenHunter_16 Jun. 30 16.11
Add Registry Key and Value
Right-click “Internet" next to click “New", "Multi-String Value" in menu
ScreenHunter_17 Jun. 30 16.12Write down “Ports”
ScreenHunter_18 Jun. 30 16.13Right-click “Ports” and click “Modify…”
ScreenHunter_19 Jun. 30 16.13Write down “5000-5100” in Value data field next to click “OK” button
ScreenHunter_20 Jun. 30 16.14Right-click “Internet" next to click “New", "String Value" in menu
ScreenHunter_21 Jun. 30 16.14Write down “PortsInternetAvailable”
ScreenHunter_22 Jun. 30 16.15Right-click “PortsInternetAvailable” and click “Modify…”
ScreenHunter_23 Jun. 30 16.16
Write down “Y” in Value data field next to click “OK” button
ScreenHunter_24 Jun. 30 16.16Right-click “Internet" next to click “New", "String Value" in menu
ScreenHunter_25 Jun. 30 16.17Write down “UseInternetPorts”
ScreenHunter_26 Jun. 30 16.17
Right-click “UseInternetPorts” and click “Modify…”
ScreenHunter_27 Jun. 30 16.18Write down “Y” in Value data field next to click “OK” button
ScreenHunter_28 Jun. 30 16.18Now we have already finished the registry setting.
ScreenHunter_29 Jun. 30 16.18Restart this Server so that all applications use RPC dynamic port will run on between 5000 and 5100.

In the moment, the firewall need to create a rule for TCP/5000-5100 from DFSR Server to DC. So does that the health report will be generated now.

For reference KB 154596

2012年7月7日 星期六

one-way DFSR on Windows Server 2008 R2 (part 3 of 3)

By default, the Replication Group Schedule is real time and 512 Kbps bandwidth usage.
ScreenHunter_03 Jul. 01 10.19
If the source(VBHV-FS-01) and destination(VBHV-FS-11) just only have empty folder,its replication mechanism is very simple --- put data to VBHV-FS-01 and data will replicate to VBHV-FS-11.

If the source and destination folder has the different data on replicated folder, it will occur the DfsPrivate folder to handle the conflict or delete status.
ScreenHunter_04 Jul. 01 10.34
If you want to delete data on the destination(VBHV-FS-11),
ScreenHunter_39 Jun. 30 17.00the file access denied message will show up because this folder attribute is read-only.
ScreenHunter_40 Jun. 30 17.00
If you want to correct replication schedule, you can do the following process:
Click “Connections” tab and select one connection you want to correct it next to click “Properties” link
ScreenHunter_05 Jul. 01 10.49Click “Schedule” tab and select “Custom connection schedule” option next to click “Edit Schedule…” button
ScreenHunter_06 Jul. 01 10.49Click “Details >>” button
ScreenHunter_07 Jul. 01 10.50Select one Day as “Sunday” next to click “Edit…” button
ScreenHunter_08 Jul. 01 10.51Select Start time, End time and bandwidth next to click “OK” button
ScreenHunter_11 Jul. 01 11.05Click “OK” button to complete edit schedule
ScreenHunter_12 Jul. 01 11.06The schedule type also change to “Custom Connection Schedule”
ScreenHunter_13 Jul. 01 11.06
If you want to force replication data from source to destination and doesn’t change the schedule setting, you can execute command as “dfsrdiag syncnow /partner:<Source Computer Name> /RGName:<Replication Group Name> /member:<Destination Computer Name> /Time:1” in VBHV-FS-01 console.
ScreenHunter_14 Jul. 01 11.57
If you want to quickly get any change as new DFSR connection creation, you can execute command to poll AD in DFSR Server console after AD replication finish.
ScreenHunter_05 Jun. 15 18.56
If you want to know replication health, please select one replication group name as “One Way Replication with the same Folder Name” next to click “Create Diagnostic Report…” link.
ScreenHunter_07 Jun. 30 15.14Select “Health report” option next to click “Next >” button
ScreenHunter_08 Jun. 30 15.14Choose Report path as “C:\DFSReports” next to click “Next >” button
ScreenHunter_09 Jun. 30 15.15Choose Included members as “VBHV-FS-01”,"VBHV-FS-11” next to click “Next >” button
ScreenHunter_10 Jun. 30 15.15Select “Yes, count backlogged files in this report” and Reference Member as “VBHV-FS-01”, enable “Count the replicated files and their sizes on each member” check box next to click “Next  >” button
ScreenHunter_11 Jun. 30 15.15Click “Create” button
ScreenHunter_12 Jun. 30 15.15Generate report in process
ScreenHunter_13 Jun. 30 15.16Now the Health Report has already been generated.
ScreenHunter_14 Jun. 30 15.24


<<<   one-way DFSR on Windows Server 2008 R2 (part 2 of 3)

2012年6月30日 星期六

one-way DFSR on Windows Server 2008 R2 (part 2 of 3)

After prepare the related prerequisite, I will begin to setup the DFSR configuration by management utility.

Configure DFSR
In DFS Management, right-click “Replication” and select “New Replication Group…” in menu to launch New Replication Group Wizard
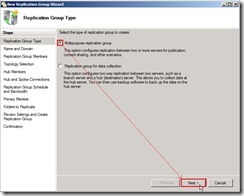
ScreenHunter_08 Jun. 13 18.24In New Replication Group Wizard, select the option of Replication Group Type as “Multipurpose replication group” next to click “Next >” button
ScreenHunter_09 Jun. 13 18.37Write down the name of replication group as “One Way Replication with…” and Optional description of replication group as “Data replicate from DMZ to Internal”, select Domain as “dw.com” next to click “Next >” button
ScreenHunter_11 Jun. 13 18.47Click “Add…” button for selecting Replication Group Members
ScreenHunter_12 Jun. 13 18.47From this location “dw.com” to enter the object name as “VBHV-FS-01;VBHV-FS-11” next to click “Check Names” button
ScreenHunter_13 Jun. 13 18.48After the object names are resolved, please click “OK” button
ScreenHunter_14 Jun. 13 18.49Check members progress now
ScreenHunter_15 Jun. 13 18.49When the members have already added, click “Next >" button
ScreenHunter_02 Jun. 14 20.30Due to I will create One-Way replication, select “No topology” option next to click “Next >” button
ScreenHunter_03 Jun. 14 20.30The warning message show up and tell us that the custom topology need to be created by ourselves after this wizard finishes.
ScreenHunter_04 Jun. 14 20.31Select Primary member as “VBHV-FS-01” next to click “Next >” button
ScreenHunter_06 Jun. 14 20.32Click “Add…” button to select a folder on the primary member
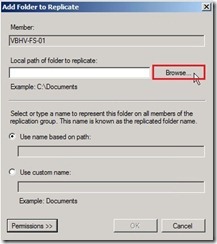
ScreenHunter_07 Jun. 14 20.33Click “Browse…” button for selecting local path of folder
ScreenHunter_08 Jun. 14 20.33Select a folder as “DMZ to Internal” next to click “OK” button
ScreenHunter_09 Jun. 14 20.34The Use name based on path option will be choose and name is “DMZ to Internal” as folder name. If doesn’t need to use custom name, please click “OK” button to go ahead.
ScreenHunter_10 Jun. 14 20.35Click “Next >” button
ScreenHunter_11 Jun. 14 20.36Click “Edit…” for selecting the local path of the replicated folder
ScreenHunter_12 Jun. 14 20.37Select “Enabled” option next to click “Browse…” button
ScreenHunter_13 Jun. 14 20.38Select a folder as “DMZ to Internal” next to click “OK” button
ScreenHunter_14 Jun. 14 20.38Click “OK” button
ScreenHunter_15 Jun. 14 20.39Click “Next >” button
ScreenHunter_16 Jun. 14 20.39If the settings are correct, click “Create” button to begin to create the new replication group.
ScreenHunter_17 Jun. 14 20.40When the status show “Success” word, we have already completed the New Replication Group Wizard now.
ScreenHunter_18 Jun. 14 20.40After click “Close” button, the warning message show up again and tell us that the replication never begin right now due to the configuration will depend on Active Directory Domain Services replication latency and polling interval.
ScreenHunter_19 Jun. 14 20.41Now the DFS Management about Replication setting is as follows:
ScreenHunter_20 Jun. 14 20.42Due to only create one replication path from VBHV-FS-01 to VBHV-FS-11, the reverse path from VBHV-FS-11 to VBHV-FS-01 also need to be created so that the topology will be fully connected.
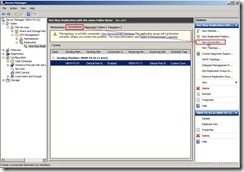
Click “Connections” tab and “New Connection…” action
ScreenHunter_01 Jun. 30 14.20Change Sending member to “VBHV-FS-11” and Receiving member to “VBHV-FS-01”, disable “Create a second connection in the opposite direction” check box next to click “OK” button
ScreenHunter_03 Jun. 30 14.24Now the reverse replication has already been created.
ScreenHunter_04 Jun. 30 14.24Click “Memberships” tab, right-click “VBHV-FS-11” next to select “Make read-only” in menu
ScreenHunter_05 Jun. 30 14.25So do that will change Replicated Folder is read-only attribute.
ScreenHunter_06 Jun. 30 14.25Until now, we have already completed the one-way DFSR configuration.
In next article, I will confirm whether the replication function is normal.

<<<   one-way DFSR on Windows Server 2008 R2 (part 1 of 3)

Since 2010 Design by Davidwa
©Copyright Davidwa Inc. All rights reserved.