網頁

顯示具有 技術---Openfiler 標籤的文章。 顯示所有文章

2012年1月1日 星期日

Cannot create physical volume in openfiler

I ever follow some articles about "Openfiler Active/Passive with Corosync, Pacemaker and DRBD" to build Openfiler HA in my lab. The only different is that the Logical Volume is as mirrored disk between Openfilers. But the result fail.

So I decide to rebuild the volume group depend on Software RAID 10 in Openfiler.
When I directly create a new RAID partition by GUI,
the result is the screen show up Block Device Management, not any progress!
When I execute the command "pvcreate /dev/md0" in console, it show the error message as "Device /dev/md0 not found (or ignored by filtering).

According to this error message, I search the related articles by Google and try some method based on these articles. But the result always fail.

I spend more time to think what happen and how to resolve it. By reviewing the all steps of lab, I finally find out that I ever change LVM configuration. The file is /etc/lvm/lvm.conf.

So I decide to correct it to return the default value.
for lab

the default value

After changing and reboot the system, it return to the initial setting of volume Group.
It is reason that the configuration of disk and RAID partition is the same as the original system. Otherwise,it should be do in he disaster and recovery process, I guess.

2011年11月12日 星期六

Create MPIO between Windows Server 2008 R2 and Openfiler 2.99.1

Recently, the service of exchange server happen interrupted due to data dirty shutdown. In analyze the log record on network and system, we find out the reason is "iSCSI network quality is unstable". That is sometimes up or down.  How to improve this problem? We decide to build MPIO mechanism between iSCSI target and initiator. And until now, it never happen the same problem again.

What is MPIO? It is very attractive for me and let me want to realize its theory and practice. So I decide to emulate it by myself --- Build a lab for leaning it.

In my lab, I use Openfiler 2.99.1 as the iSCSI storage and VM as each machine because I have no memory to purchase the same machine as the company production. The following diagram is my lab environment:
Now I will begin to do all process step by step!


Confirm the network setting on Openfiler 2.99.1 and Windows Server 2008 R2

  • After install Openfiler 2.99.1 and update last patch, I need to confirm whether Openfiler has two network card belong to the Storage Network.


Delegate the network access to Windows Server 2008 R2 on Openfiler 2.99.1

  • After confirm network card, the next step will create LUN Mapping on iSCSI target for iSCSI initiator.
  • Assign host static IP=10.10.106.70 and 10.10.106.71 to individually on network access configuration


  • Click "Volume" -- >  "iSCSI Targets" -- > "Network ACL" -- > select "Allow" in menu -- > click "Update" button.  After finish the above steps,the three IQN can be accessed by this window host.


Realize the disk status on Windows Server 2008 R2

  • In iSCSI initiator role as windows server 2008 R2 platform, click "Start" -- > "Administrative Tools" -- > "Computer Management"


  • In Computer Management Console, click "Disk Management" to realize the present disk information.  You will see that just only one disk on this system now.


Install the MPIO feature on Windows Server 2008 R2

  • The focus come on now! We will begin to prepare MPIO installation and configuration at the moment. Please click "Start" -- > "Administrative Tools" -- > "Server Manager"

  • In Server Manager Console, click"Features" -- > "Add Features"

  • In Add Features Wizard windows, enable "Multpath I/O" check box -- > "Next >"

  • Click "Install"

  • Click "Close" button to finish install this feature next to reboot


  • Add the first path to iSCSI Target


  • The screen show up that Microsoft iSCSI Service will be started if you agree and click "Yes" button.


  • Click "Discovery" tab and "Discover Portal ..." button


  • Key in the first IP of  iSCSI target and click "OK" button


  • You will see the previous setting on Target Portal record. Click "Discover Portal ..." button again

  • Key in the second IP of  iSCSI target and click "OK" button

  • Now you see the two IP of iSCSI target has been added the Target Portals record.


  • Click "Targets" tab and select one IQN that you want to connect with it later. Click "Connect" button


  • Enable check box on "Add this connection to the list of Favorite Targets" and "Enable mult-path" next to click "Advanced" button


  • Select Local adapter: "Microsoft iSCSI Initiator" , Initiator IP: "10.10.106.70" (The first IP of Server), and Target portal IP: "10.10.106.80/3260" (The first IP of Openfiler)


  • This iSCSI disk has already been connected by Server now.


Enable MPIO on iSCSI Service

  • Click "Start" -- > "Administrative Tools" -- > "MPIO"


  • In "MPIO Devices" tab,you will see a default device called  "Vendor 8 Product    16"


  • Click "Discover Multi-Paths" tab -- > enable "Add support for iSCSI Drives" check box -- > click "Add" button


  • Reboot Windows Server 2008 R2

  • In "MPIO Devices" tab,you will see a new device called  "MSFT2005iSCSIBusType_0x9"


Add the second path to iSCSI Target

  • Open the iSCSI initiator again and click "Target" tab ; select the first IQN and click "Connect" button


  • Enable "Add this connection to the list of Favorite Targets" and "Enable Multi-path" check box ; Click "Advanced..." button


  • Select "Microsoft iSCSI Initiator" on local adapter and the second Server NIC is "10.10.106.71" and the second Storage NIC "10.10.106.81" ; Click "OK" button


View MPIO setting on disk

  • In Computer Management console, you will see a new disk that never is initiated format.


  • Right-Click this and select the properties in menu


  • Select "MPIO" tab, you will see the MPIO policy, DSM name and Path State and so on.


Until now, we have already completed the MPIO creation between Windows Server 2008 R2 and Openfiler 2.99.1. As to whether MPIO function is normal now, I will introduce this to you in the next article.

2011年10月27日 星期四

Prepare iSCSI Target IQN for host access on Openfiler 2.99.1

In the previous article ever create a physical volume with Software RAID on Openfiler 2.99. Next step, I will add this physical volume to a new volume group. So I do the following activity to create a volume group and its the membership is physical volume.
 "Volumes" --> "Volume Group" --> enable check /dev/md0 --> key in a volume group name "vg01" --> click "Add Volume Group" button.

Click "view member PVs" to verify the Software RAID disk information.

Next to create some logical volume from this volume group. So I do the related steps as follows:
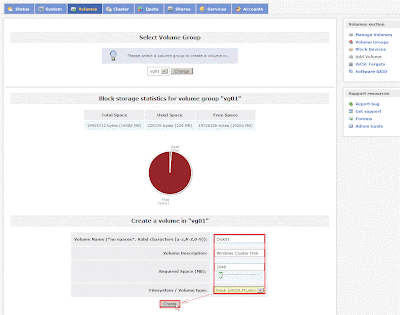
"Volumes" --> "Add Volume" --> select a volume group "vg01" and click "Change" button --> Key in some information for logical volume as name, description, size and type --> click "Create" button

After do it, you will see the logical volume "q01"  information and occupy the percentage of volume group.

Repeat the above step to create the second logical volume "disk01".

Repeat the above step to create the second logical volume "disk02".

Next to create iSCSI Target IQN
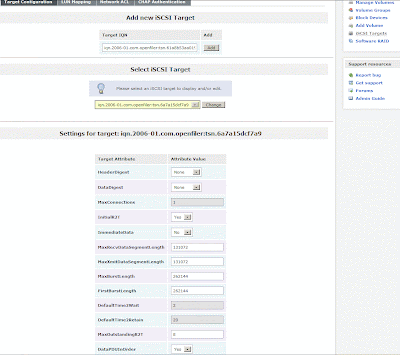
"Volumes" --> "iSCSI Targets" --> "Target Configuration" --> click "Add" button
You will see this IQN setting and the related parameter for you change it.

Double click "Add" button to create the second and third IQN.

You will see three IQN in menu now.

Select the first IQN in menu and click "Change" button. If the Settings for target IQN is your choice,please click "LUN Mapping" tab.

When the R/W Mode="write-thru" and Transfer Mode="blockio" are your willing choice in the first logical volume,please click "Map" button.

So do that LUN path /dev/vg01/q01 will map to the first iSCSI target IQN.

Return to "Target Configuration" tab to select the second IQN in menu next to click "Change" button
When you see "Settings for target IQN" is the second IQN value, please click "LUN Mapping" again.
Click "Map" button in the second logical volume.
So do that LUN path /dev/vg01/disk01 will map to the second iSCSI target IQN.

Return again to "Target Configuration" tab to select the third IQN in menu next to click "Change" button
When you see "Settings for target IQN" is the third IQN value, please click "LUN Mapping" again.
Click "Map" button in the third logical volume.
So do that LUN path /dev/vg01/disk02 will map to the third iSCSI target IQN.

Finally, I will set who can access these iSCSI Target IQN.
Due to this is my first setup, you need to create new network ACL by clicking "local network" hyper-link.
In the future, I will assign a host to use these IQN and it will be installed on windows server 2008 R2 with SP1 and hotfix up to date. So I key in its name, IP Address and type as follows next to click "Update" button.
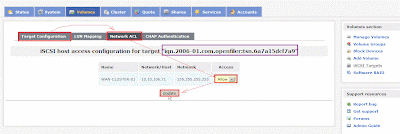
Click "Volume" -->  "iSCSI Targets" --> "Network ACL" --> select "Allow" in menu --> click "Update" button. Now the first IQN can be accessed by this window host.
Repeat the above steps for the second and third IQN to assign the host to access it.
Until now, I have already prepared three iSCSI Target IQN for host access.
Since 2010 Design by Davidwa
©Copyright Davidwa Inc. All rights reserved.