網頁

顯示具有 技術---VMware 標籤的文章。 顯示所有文章

2016年12月17日 星期六

VMware Workstation 12.5 --- How to install VMware Tools on Mac OS X guest

If we want to learn Mac OS X environment without Mac device, we can use the VM on VMware or Virtualbox to taste it. In Google, we can find out more and more method to tell us how to install it. I ever try to install Mac OS 10.10 on vmware or virtulabox, but the screen display is not good in virtualbox because it need to correct some parameter. As to vmware, it is very simple if we can install VMware tool on VM guest.
In the moment, I will show you how to install vmware tools on Mac OS X.

To download the latest version of VMware Tools for Mac OS X from VMware CDS repository for Fusion http://softwareupdate.vmware.com/cds/vmw-desktop/fusion/

To extract com.vmware.fusion.tools.darwin.zip.tar until see the darwin.iso is placed on the "payload" folder

In the Virtual Machine Settings, to select use ISO image file by browsing darwin.iso

In the Mac OS X guest, the VMware Tools dialog box will appear so that click Install VMware Tools

It will trigger the installation of VMware Tool process so that we will click Continue button on Introduction tab.

On Destination Select tab still click Continue button

On Installation Type tab click Install button if we accept the default path.

Then key in the user name and password for installing new software.

To click Continue Installation button again

When the installation is successful, please click Restart button to finish the software installed.


2012年1月17日 星期二

Hyper-V VM cannot start in the VM of VMWare Worksation

Although the VMWare Workstation version 7 or later include a function "Virtualize Intel VT-x or AMD-V" so that can install Microsoft Hyper-V on VMWARE VM,

But it still is not normal after installing OS on Hyper-V VM next to boot it.

A tricky point just needs to add a record hypervisor.cpuid.v0="FALSE" in vmware configuration.

After doing it, the OS of Hyper-V VM in VMWare Workstation's VM can be started now.
I hope it will be added automatically on next version. Don't need to correct it manually.

2011年8月15日 星期一

Change hostname,IP Address and certificate on ESX Service Console

For saving my disk space, I prepare for doing Cloned-Link virtual disk on ESX Server. By following the previous process from my blogger article (http://daviwa.blogspot.com/2011/06/to-create-linked-clone-vmdk-by-vdkexe.html), it did can boot into ESX Console Mode and I can connect with it by VMware vShpere Client.

But I find a question: If I duplicate ESX Server, I need to change some information as hostname, IP Address and so on. Of course, the certificate also need to be renewed after change the hostname.

Although I know how to change hostname and IP address on Linux platform as CentOS or Redhat, I don't know what procedure is right or how to do it?

At first, please using the editor as "vi /etc/vmware/esx.conf" to correct the parent disk parameter.
the original parameter

the cloned-link parameter

Next to correct hostname by "vi /etc/hosts"
the original parameter

the cloned-link parameter

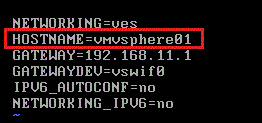
And correct HOSTNAME or GAEWAY by  "vi /etc/sysconfig/network"
the original parameter

the cloned-link parameter

Finally,please change ESX service console interface by the following command.
So do that you will see the service console is changed now.

After finishing the above steps, please reboot it and the ESX service console will be changed to the new Server or IP.

Please log on the console again by root for regenerating the new certificate.
After backing the original certificate by the following command

And regenerate the new certificate by this command --- "service mgmt-vmware restart",you will see the new certificate is created on screen.

When you reconnect with ESX by VMware vShpere Client and click "view certificate" button

you will see this certificate issue to ESX02.dw.com now.

2011年7月9日 星期六

To expand VMware disk by Virtual Disk Factory

Recently, I make a plan to install SNMP component on all online servers in my job. There is more and more servers need to be install it manually so that this will spend a lot of time to handle for me. Whether has smart & good tool to install it remotely?  I find out one free tool can help me to finish my thought. It is "Solarwinds Enable Enabler for Windows". In official expression, this tool can install, configure, enable SNMP component remotely.
If it is true, I think it will help us to save more time to handle it by remote control.

Due to I have no system right or no time to focus on testing it in company, so I decide to make a lab for verifying at home. Of course, this lab will be built on virtual environment --- VMWare Workstation because it is my familiar virtual tool now.

I never boot the virtual machine of window 2003 system for a long time since Windows 7 or Windows 2008 R2 is on the market. When I boot it and install the related security hotfix up to date, I find the drive C space is not a little enough.

Whether has method to expand the original disk space? I know there is a command to finish this target, but I forget how to do it. Suddenly, I think I ever use a tool to do the same thing. That is "Virtual Disk Factory".

At first, you have to power off your VM for expanding disk space. In VDF GUI, click "Expand" tab next to click button in Virtual Disk attribute for selecting a .vmdk file.

If VM disk never interrupt or the function is normal, it will pop up a window that show "Current Disk Information" as current disk size = 8GB

In Disk Size group, the first step click GB option next to key in 30 for expanding disk from 8GB to 30GB.

If the above step finish, please click "Expand Disk" button to begin the expand disk process.

Finally, you will see old & new C/H/S and completion message.

Please boot to VM again and check disk size by computer management. You will see the Disk Size is 30 GB but additional disk belong to the second partition.

If you want to extend partition from two to one, maybe you can use tool as Gparted Live CD to do it!

2011年6月26日 星期日

To create linked clone VMDK by vdk.exe tool

After confirming the hardware to realize whether can install Hyper-V on my computer, I will prepare to build the Lab on VMware environment. I have no enough disk space then so that think whether can create OS by linked clone disk. For this reason, I will prepare to use the built-in function on VMware Workstation because I ever do it successfully on 32-bit Windows XP.

In VMware Workstation, I want to create linked clone on 64-bit Windows 2008 R2 Server by clicking the "Import or Export ..." function.

When click "Import or Export..." in menu list, the Conversion Wizard will show up.

After following the Wizard process and select "Source VM or image", it show me error message "Unsupported guest operating system". So far, I know the Conversion Wizard built-in VMware Workstation cannot convert "Windows 2008 R2 Server" VM or image so that the linked clone activity cannot built now.

Whether is there the freeware utility to create linked clone VMDK? By Google, I find out the vdk.exe can do it! Thank Ken Katos develop this and share it on public environment.

To search this tool by Google and download it on VMDK source, you can see two files --- vdk.exe and vdk.sys.

To open CMD prompt by Run as administrator and switch to VMDK source path, please type the command as vdk.exe open 0 "Windows Server 2008 R2 x64.vmdk" /undo on 32 bit Windows 7 host.
                         Note: VM must power off then and its state is good that boot process is normal before.

In execution process, please ignore any unknown message to type i always due to vdk.exe cannot judge new function.


Finally, it will create new file with extension name .REDO on the source directory.

Do the above steps, please remember to unmount image disk by typing vdk close 0

Next to copy these files to new directory \LinkCloneDisk and remove these extension name .REDO from these new files. So the extension name is .VMDK as follows.

To open "Windows Server 2008 R2 x64.vmdk" by Text editor and correct its content without .REDO extension.
Before Correct it

After Correct it

And parentFileNameHint point to the full path as follows:
Before Correct it
After Correct it

Now you have already created linked Clone VMDK template disk!

How to use it later?
The steps is like before by using the New Virtual Machine Wizard on VMware Workstation.

The key point is that select "Use an existing virtual disk" option on "Select a Disk" step.

And select "Windows Server 2008 R2 x64.vmdk" under the LinkCloneDisk directory.

After finishing the Wizard, the system will be boot normally.
Since 2010 Design by Davidwa
©Copyright Davidwa Inc. All rights reserved.