網頁

2012年5月17日 星期四

Computer cannot Log on AD by domain account

I don’t know when trust relationship has problem between DC and member server because I get a error message after keying in domain account.
ScreenHunter_05 May. 17 16.34Based on this error message, I search the related information by Google and try and error some method. Finally, the problem is resolved.

How to correct it?
Verify whether the value of servicePrincipleName of the computer exist or true!

Run ADSIEDIT.MSC and Right-Click the affected computer to select the property
ScreenHunter_06 May. 17 16.35In “Attribute Editor” tab, mark “servicePrincipalName” next to click “Edit” button
ScreenHunter_07 May. 17 17.03Add new value as “HOST/yourcomputername.yourdomainname” next to click “Add” button. (In our example, it is “HOST/vbhv-fs-01.dw.com”)
ScreenHunter_11 May. 17 17.08That is servicePrincipalName value = HOST/vbhv-fs-01.dw.com
ScreenHunter_13 May. 17 17.08Now I can log on in this workstation by domain account.
ScreenHunter_14 May. 17 17.09

2012年5月6日 星期日

Install 64-bit Oracle Client on 64-bit Windows 7

Last time, I install 32-bit PowerPivot 2012 on 32-bit Windows 7 to replace PowerPivot 2010. When I open Excel 2010 and select PowerPivot item, the remind message show up and ask me whether want to upgrade the workbook.
ScreenHunter_02 May. 06 11.50Of course, you have to press “OK” button so that the PowerPivot workbook will be showed up. In the moment, I follow the previous activity to execute refresh worksheet for retrieving Oracle Data but the result fail.
ScreenHunter_01 May. 06 11.46In this Error Message, it give me a suggestion either upgrading to 64-bit version or increasing memory. I choose upgrading to 64-bit version because the original 32-bit environment before replace PowerPivot version is normal so that it will be not enough memory.

For 64-bit environment, I need to install 64-bit OS, Office 2010, PowerPivot and hotfix with up-to-date. When finish the related Microsoft Prerequisite, the Oracle Client need to be installed then.
ScreenHunter_05 May. 06 13.50Download “Oracle Database 11g Release 2 Client (11.2.0.1.0) for Microsoft Windows (x64) from Oracle Website and extract “win64_11gR2_client” compressed file to the selected folder. The extracted path will be “\client” and its setup file is under this path.
Executing "setup.exe” to begin the installation process of Oracle Client.
ScreenHunter_03 May. 06 13.21In Select Installation Type,select “Administrator” option next to click “Next>” button
ScreenHunter_06 May. 06 14.29Click “Next> “ button if we don’t need to select another language.
ScreenHunter_07 May. 06 14.29Keep the default Oracle Base and Software Location next to click “Next> “ button
ScreenHunter_08 May. 06 14.29If no any problem in Perform Prerequisite Checks, click “Finish” button to begin to install Oracle Client Software now.
ScreenHunter_09 May. 06 14.30The installation of Oracle Client almost is successful if no any surprise.
ScreenHunter_10 May. 06 14.52
In the moment, we need to add a “tnsnames.oRA” file under the installation path as “c:\app\davidwa_wang\product\11.2.0\client_1\network\admin\” for creating an entry in this file to allows the ODBC driver to establish network connections to an Oracle Database.
ScreenHunter_11 May. 06 14.54In this file content, need to define “Data Source Name”, "Host” (by FQDN or NETBIOS name or IP), “Port” (default = 1521) and “Service Name”
ScreenHunter_12 May. 06 14.55After saving this file and opening Excel 2010 to execute PowerPivot Data Refresh, its function will be normal now.
ScreenHunter_13 May. 06 15.15

2012年5月4日 星期五

Install Microsoft SQL Server 2012 PowerPivot for Microsoft Excel 2010

Microsoft PowerPivot for Excel is a exciting tool for analyzing data. It is very convenient for us to use in Excel because we almost don’t need to write any code for data analysis.
Since Microsoft Powerpivot for Microsoft Excel 2010 release, I have already used it in business work for a long time. Recently, I decide to change its version to 64-bit Microsoft SQL 2012 Powerpivot for Microsoft Excel 2010 because I get memory issue when run it. I think the 64-bit version can extend more memory than 32-bit one!

When I download “PowerPivot_for_Excel_amd64.msi” from this URL http://www.microsoft.com/en-us/download/details.aspx?id=29074 and execute it on Windows 7 64-bit version, I get a error message as follows:
ScreenHunter_01 May. 02 16.38I read PowerPivot Instructions and find out I forget to install “Visual Studio 2010 Tools for Office Runtime” in the moment.
ScreenHunter_02 May. 02 17.03So I download 64-bit version and install it next to update the last hotfix, I can install Microsoft SQL Server 2012 PowerPivot by Wizard now.
ScreenHunter_06 May. 04 22.09After installing PowerPivot next to open Excel program, I find out that PowerPivot item never show in menu.
ScreenHunter_03 May. 04 21.53I know need to do something to enable it.
Click “File” –>  "Options”, it will show up Excel Options window.
ScreenHunter_04 May. 04 21.55In Excel Options, click “Add-Ins” –> Select “COM Add-ins” in Manage menu –> Click “Go…” button and the COM Add-Ins window will show up.
ScreenHunter_08 May. 04 22.11In COM Add-Ins window, enable “PowerPivot for Excel” check box next to click “OK” button, the result is nothing happen --- that is “PowerPivot” item still disappear.
Why?
Because COM Add-Ins load behavior fail!
ScreenHunter_09 May. 04 22.13How to resolve this problem? Reinstall .Net Framework 4.0 again!
You can download .NET Framework 4 (Web Installer) or (Standalone Installer) from Microsoft Web Site.
ScreenHunter_10 May. 04 22.38After Installation is completed, don’t forget to check Windows Update again.
ScreenHunter_11 May. 04 22.45Redo the above process to enable “PowerPivot” check box, the load behavior is normal.
ScreenHunter_12 May. 04 22.47And PowerPivot item can be see now.
ScreenHunter_13 May. 04 22.48I think the key point is whether “Microsoft .NET Framework 4 Extended” exist.
ScreenHunter_14 May. 04 22.53

2012年4月29日 星期日

Recover data from Volume Shadow Copy mechanism (part 2 of 2)


(2).Use ShadowExplorer Utility
We can download from http://www.shadowexplorer.com/downloads.html and install it on 32-bit or 64-bit Windows platform.
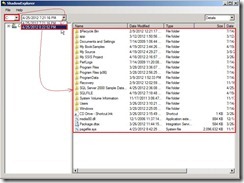
ScreenHunter_29 Apr. 26 21.15Open this program next to select one volume as “C:” and create time, you can see all contents in right plane.
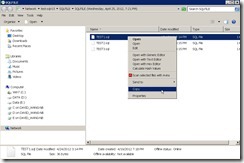
ScreenHunter_01 Apr. 27 16.23Right-Click the loss data from this and select “Export” to put this data to the special location.
ScreenHunter_04 Apr. 27 17.02In Server version, we need to do item (1) for creating Shadow Copy.
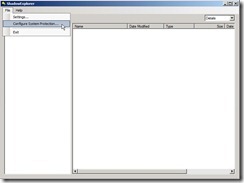
But in workstation version as 64-bit windows 7, We can directly create it by ShadowExplorer’s “Configure System Protection…”
ScreenHunter_02 Apr. 27 16.28It will pop up the System Properties and press “Create…” button for creating Shadow Copy.
ScreenHunter_03 Apr. 27 16.29
(3).Restore file by Shared Folder in Remote ComputerIf one folder want to be restored, we can make it into shared folder as “\\TEST-SQL-03\sqlfile”
ScreenHunter_05 Apr. 27 17.18In remote computer with Shadow Copy Client installed, right-click this shared folder next to select “Properties” in menu so that the shared folder property will show up.
In the proptery of shared folder, click “Previous Versions” tab –> select the right timestamp –> click “Open” button
ScreenHunter_06 Apr. 27 17.23So does that all files will show up behind this shared folder. Now we can select one or some loss files to recover.
ScreenHunter_08 Apr. 27 17.24Or If we click “Copy” button and select one path, all files & folders behind the shared folder will be restored into the special path.
ScreenHunter_09 Apr. 27 17.36

<<<   Recover data from Volume Shadow Copy mechanism (part 1 of 2)

Recover data from Volume Shadow Copy mechanism (part 1 of 2)

Volume Shadow Copy is a Microsoft mechanism that can automatically backup the volume content based on pre-determined interval. If need to restore individual files,you can select any of the previous 64 versions of the shadowed volume to restore it and get the deleted, damaged or overwritten files.

At first, we need to configure and enable Shadow Copy from command line or computer management as follows:
Adds a shadow copy storage association for a specified volumeTo enable Shadow Copy for a volume, we can do the following syntax from the command-line RunAs administrator:
”vssadmin add shadowstorage /for=volume /on=storevolume /maxsize=xxxMB”
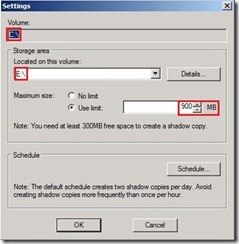
ScreenHunter_19 Apr. 25 17.18In the Shadow Copies tab of property of Volume, click  “Volume C:\” and “Settings” button
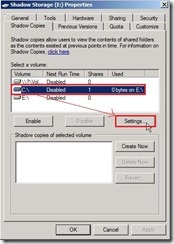
ScreenHunter_21 Apr. 25 18.45You will see the related value mapping to the above command-line
ScreenHunter_22 Apr. 25 18.48Run “vssadmin list shadows” & “vssadmin list shadowstorage” again to realize the information about shadow copy
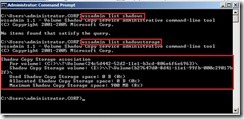
ScreenHunter_23 Apr. 25 19.07
Creates a new shadow copy of a specified volume

To create Shadow Copy for a volume, we can do the following syntax from the command-line RunAs administrator:
”vssadmin create shadow /for=volume”
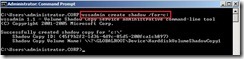
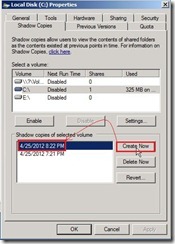
ScreenHunter_24 Apr. 25 19.22In the Shadow Copies tab of property of Volume, you will see a times tag on Shadow copies of selected volume.
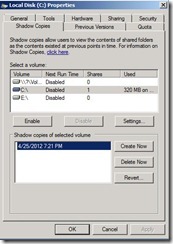
ScreenHunter_25 Apr. 25 20.15The above command is as click “Create Now” button so that it show a new time tag record now.
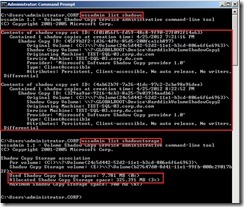
ScreenHunter_26 Apr. 25 20.23Run “vssadmin list shadows” & “vssadmin list shadowstorage” again to know there is two contents of shadow copy and its storage space is occupied now.
ScreenHunter_27 Apr. 25 20.29
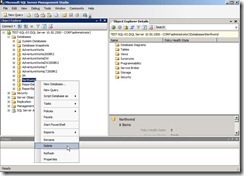
One day, I go wrong to delete a database “Northwind” & overwrite file content from “1” to “shadow copy” in C:\SQLFILE\TEST1.sql
ScreenHunter_01 Apr. 26 11.20ScreenHunter_02 Apr. 26 11.24
How to recover these data now?

(1).Create a symbolic link to a shadow copy volume<Method 1>
Run “vssadmin list shadows /for=C:” and base on create time to find which shadow copy volume will be restored. In the output screen, we will use this shadow copy volume “\\?\GLOBALROOT\Device\HarddiskVolumeShadowCopy2” as restore base.
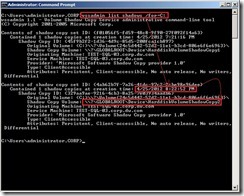
ScreenHunter_04 Apr. 26 12.03To create a directory symbolic link, we can do the following syntax from the command-line RunAs administrator: ”mklink /d NewLinkName ShadowCopyVolume\
ScreenHunter_06 Apr. 26 14.04Now we can explore the content of shadow copy.
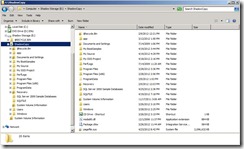
ScreenHunter_07 Apr. 26 14.06
<Method 2>
Right-click the drive letter on which the shadow copy is created next to click “Properties” in menu.
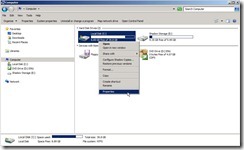
ScreenHunter_08 Apr. 26 14.13In Disk Properties, click “Previous Versions” –> select one shadow copies based on data modified –> click “Open” button
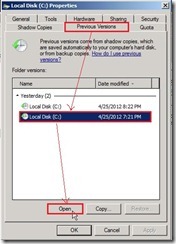
ScreenHunter_09 Apr. 26 14.15Now we can explore the content of shadow copy.
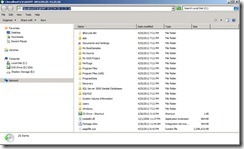
ScreenHunter_10 Apr. 26 14.22When we choose either method, the loss file will be found and recovered now!

Since 2010 Design by Davidwa
©Copyright Davidwa Inc. All rights reserved.