Its synchronization exists four types:
1. non-cluster to non-cluster
2. non-cluster to cluster
3. cluster to non-cluster
4. cluster to cluster
In the following lab, I will introduce how to do it on non-cluster environment.

Configure the firewall on Replica Server
To configure the firewall rules for Kerberos authentication, click Advanced settings link to open Windows Firewall with Advance Security Management in Control Panel/System and Security/Windows Firewall.
 In Windows Firewall with Advanced Security Management, click Inbound Rules next to select Hyper-V Replica HTTP Listener (TCP-In) and click Enable Rule
Configure the Replica server to receive replication
In Hyper-V Manager, click the Replica Server next to click Hyper-V Setting… link in the Actions panel
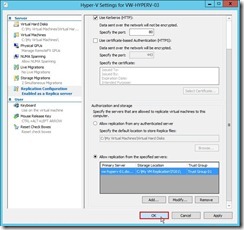
 In the Hyper-V Settings dialog, click Replication Configuration Enabled as a Replica server in Server panel, select Enable this computer as a Replica server and User Kerberos (HTTP) check box in the Authentication and ports section
 In the Authorization and storage section, select Allow replication from the specified servers radius button next to click Add… button
 In Add Authorization Entry dialog, write down the individual primary server as vw-hyperv-01.dw.com by <FQDN> or the particular domain as *.dw.com by *.<Domain Name> in Specify the primary server field, designate the special location for storing replica files, and assign a name as Trust Group 01 with the trust group tag.
 Click OK button if we are finished
 Click OK button if this reminding message “Inbound traffic needs to be allowed in the Firewall” has already been done.
Enable replication for VM on Primary serverIn Hyper-V Manager, select a VM that want to be replicated next to click Enable Replication… link to launch the Enable Replication wizard.
 In Before You Begin page, click Next > button
 In Specify Replica Server page, enter either NETBIOS or FQDN on Replica server field next to click Next > button
 In Specify Connection Parameters page, the port number and authentication type of the Replica server will automatically be populated if Remote WMI is enabled. So that keep the original setting about Compress the data that is transmitted over the network check box and then click Next > button.
 In Choose Replication VHDs page, clear the check box of some VHDs that we don’t want to replicate next to click Next > button
  In Configure Recovery History page, select Additional recovery points option, assign a number of additional recovery points to be stored, enable and change copy frequency for Replication incremental VSS next to click Next > button
 In Choose Initial Replication Method page, select the initial replication method and schedule initial replication based on the decision next to click Next > button
 Click Finish button to complete the enable replication wizard (# 2)
 Due to we choose the initial copy over the network, the transmission traffic will begin to be high in the send of Primary Server or the receive of Replica Server.

Monitor replication health
In Hyper-V Manager of Replica Server, right-click the replicating VM next to select Replication and View Replication Health… in menu to launch the health report.
 In Replication Health dialog, it will show the current replication status and some statistics.
 Repeat the above steps on primary server and also can view replication health.
Perform a Test Failover on Replica Server
In Hyper-V Manager, right-click VM of Replica Server next to select Replication and Test Failover… in menu
 In Test Failover dialog, choose a recovery point next to click Test Failover button
 So does that will create a new VM with name ““<virtual machine name>-Test” as VM-MB-01-test and no connect to any network segment. In the moment, we will setup another virtual switch into this network adapter to avoid Server name conflict when it powers on.
 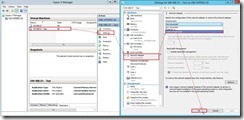 Then we need to confirm whether this VM can Start/Pause/Stop, and that any applications in the virtual machine run properly.
 If the Test VM function is normal, please right-click VM of Replica Server again next to select Replication and Test Failover… in menu
 Click Stop Test Failover button
 So does that the Test VM will be deleted and its data will be discarded now.
In the next article, I will introduce the planned failover & unplanned failover on Hyper-V 3.0
See you next time!
Reference :
(# 1) Configure your Replica server to receive replication traffic from specific primary server(s)
(# 2) In the moment, a dialog box appears and tell us replication enabled successfully. In this dialog, we can click Settings… button to configure network for VM on Replica Server.
 We can configure the same or different network setting so that the virtual machine will connect to our decided network after a failover to the Replica server.
 If click Close button, we have to manually configure the network setting for Replica VM because it doesn’t connect to any network on Replica Server by default.
<<< Hyper-V 3.0 --- Copied VM is working in another Hyper-V 3.0 Server (part 3)


