網頁

2012年9月23日 星期日

Basic Network Concept --- VLAN (part 1)

When two PC connect with Layer2 Switch by default setting and its IP address belong to the same network segment, the result must be communication can exchange each other.
ScreenHunter_01In this network topology, when DW-HYPERV-01(192.168.101.11/24) ping DW-HYPERV-02(192.168.101.130/24) on command prompt, DW-HYPERV-02 can respond the message to DW-HYPERV-01, and vice verses.
ScreenHunter_03
If we want to block the communication between PCs, maybe we can buy another Switch and one by one connect with the Switch port. But this behavior is not good idea because we will lose the money.
Why we separate the network segment?
Maybe need to separate the different department/floor or avoid Virus/Spam/Broadcast/ARP attack so that make this plan.
How to save the money?
Maybe it will be good method to configure VLAN on Switch!
ScreenHunter_04At first, we can realize what VLAN status is now by command line show vlan-switch
ScreenHunter_02In the result, all Ethernet ports are active status and are assigned to VLAN 1. This is why PC can ping and the respond is normal each other.
In the next step, we will begin to create VLAN ID on switch by command
ScreenHunter_06So does that there is two new VLAN ID on Switch now.
ScreenHunter_08Finally, assign the Switch port number to the special VLAN ID
ScreenHunter_10The port number will be mapped into VLAN ID one by one.
ScreenHunter_14In the moment, the message exchange fail between PCs each other.
ScreenHunter_11
Of course, please remember to execute command wr for building and saving configuration. Otherwise, the above setting will miss if the Switch device is restarted in the future.
ScreenHunter_12

2012年9月16日 星期日

店員說是NBA Labron James代言的NIKE籃球鞋!

最近小兒子在瘋籃球,我想多少與同學們有關, 因為上週他既然問我要如何運球?乍問之下才得知,他與同學在比賽籃球時,因為不會運球,所以常常兩次運球而犯規.
為了展現老爸的風采,當周假日期間就帶著小孩到籃球場上示範教學,雖然我也不是多厲害,但總是要維持老爸的尊嚴,說穿了,就是面子啦!

之後,就吵著要買雙籃球鞋,而且是要指定品牌---NIKE. 天阿!他也知道NIKE籃球鞋.我記得我小時候開始知道品牌籃球鞋時,也是在專科的時候,國小時的我根本不知道有此東東,可能是小時候太蠢,或者當下沒有人重視,總之,當時我也僅是穿著夜市牌.

當下聽聞後當然拒絕,且告知目前也不需要買名牌籃球鞋,要父母出錢,就到全家福就好了,不然,就自己掏腰包. 在拗不過小孩的苦苦哀求,只好再讓步:只要這學期在校成績能夠前三名即可!小孩當下表示可行. 也同意目前先到全家福買雙籃球鞋,畢竟,目前布鞋也破了,且穿布鞋打籃球也不太好.只是很奇怪耶,居然全家福找不到小孩可穿的球鞋,所有展示的最小鞋號小孩都不能穿.之後,小孩也就敗興而歸---回家去了.

講到此,您以為故事結束了!不是,故事才開始,因為老婆認為"為了NIKE球鞋而僅在一學期拼全力讀書是不對的,應該要養成小孩自我學習與讀書的習慣",故建議我可以先買鞋給他,並規定要讀完40本課外書籍後,才能抵銷球鞋費用,若做不到,才要他用自己的零用錢償還給我們. 果然是英明的老婆大人,用心良苦阿! 目的是希望小孩不是為了短益而拼一時,而是要先培養自我的能力為了將來爭千秋阿!

當下明白老婆的用意,所以就在這周假日,帶著小孩到京站NIKE專賣店買籃球鞋. 果然是NIKE專賣店,居然真的有小孩可穿的球鞋,而且是NBA Labron James代言,當然身價就不同凡祥,一雙球鞋居然要4千多! 可能是身為父母的我們沒有見過世面,因為從小到現在,好像沒有穿過3000元以上的球鞋,更別提在國小時就有這樣身價的鞋子可穿,真是現代孝子--- 孝順子女啊!

想不想看看這雙球鞋? 講真的,還滿漂亮的!
 

唯一慶幸的是: 幸好女兒沒有吵著要! 否則荷包要大失血,這個月要勒緊褲帶過日子!


2012年9月9日 星期日

Exchange Server 2010 Database (part 3)

(continue)
● How to remove Mailbox Database?
Remove a Database by EMCIn EMC, click Mailbox under Organization Configuration and select a mailbox database on the Database Management tab that we want to remove next to click Remove in the Action pane
ScreenHunter_12A warning appears and ask us whether want to remove the selected database, and click Yes button if we are sure that.
ScreenHunter_13
Remove a Database by EMSIn EMS, use the Remove-MailboxDatabase cmdlet(#1) to remove a mailbox database and type Y if we are prompted to confirm that you want to perform the action.
<Syntax>
Remove-MailboxDatabase -Identity <DatabaseIdParameter>
ScreenHunter_14
After use the EMC or EMS to remove a mailbox database, the procedure doesn’t delete the files of database and its transaction logs. That is delete it manually in the location of the file.
ScreenHunter_15
● How to modify the size limit of mailbox database?
In Exchange Server 2010, the default database size limit for Standard Edition is 50 GB but there is no default database size limit for Enterprise Edition. Due to the Exchange store will periodically check the database size limit, it will dismount a database if its size limit is reached.

We can modify the database size limit by adding or changing a value in the registry on the server that hosts the database. And this change will propagate to all servers that hold a copy of the database. In the moment, if a database is approaching its size limit, maybe result in the database is dismounted when exceed the limit then. (#3)

In EMS, we first need to know the global unique identifier (GUID) of the database.
<Syntax>
Get-MailboxDatabase [-Identity <DatabaseIdParameter>]

ScreenHunter_16Start Registry Editor and locate the following registry subkey HKEY_LOCAL_MACHINE\SYSTEM\CurrentControlSet\Services\MSExchangeIS\<Server Name>\Private-<database GUID>
If the Database Size Limit in GB DWORD exists for the subkey, directly change its value to desired size in GB. It it doesn’t exist, please create a new DWORD name and set its value to desired size in GB.
ScreenHunter_17
● How to change the database path?Change the path to a Database by EMCIn EMC, click Mailbox under Organization Configuration and select a mailbox database on the Database Management tab that we want to change the path next to click Move Database Path… in the Action pane
ScreenHunter_06The Move Database Path Wizard will show up
ScreenHunter_07In the Move Database Path Wizard, change the location of Database file path and Log folder path next to click Move button
ScreenHunter_09In the process of the move operation, the warning message will tell us the database must be temporarily dismounted if execute this so that will influence all users access mail. If no any question, please click Yes button to continue it.
ScreenHunter_10On the completion page, click Finish button if we have already confirmed the move process completed successfully.
ScreenHunter_11Back to EMC, the database file path and log folder path have already been changed and database status is mounted.
ScreenHunter_12
Change the path to a Database by EMS

In EMS, use the Move-DatabasePath cmdlet(#4) to set a new path for the mailbox database or logs and type Y if we are prompted to confirm that you want to perform the action.
<Syntax>
DatabasePath -Identity <DatabaseIdParameter>
[-EdbFilePath <EdbFilePath>]
ScreenHunter_16<Syntax>
DatabasePath -Identity <DatabaseIdParameter> [-LogFolderPath <NonRootLocalLongFullPath>]

ScreenHunter_17
What is the status of the related files?
The files state before do the move operation.
ScreenHunter_08The files state after do the move operation.
ScreenHunter_15ScreenHunter_13ScreenHunter_14
Reference:(#1) Exchange 2010 Remove-MailboxDatabase cmdlet
(#2) Exchange 2010 Get-MailboxDatabase cmdlet
(#3) A database is approaching its size limit. Exceeding the limit may result in the database becoming unavailable
(#4) Exchange 2010 Move-DatabasePath cmdlet

2012年9月3日 星期一

Exchange Server 2010 Database (part 2)

For managing Mailbox Databases, we need to know
   ● How to create and remove a mailbox database
   ● How to mount and dismount a mailbox database
   ● How to modify the size limit of mailbox database
   ● How to change the database path
   ● How to configure database property and set the maintenance schedule
So will introduce the above method step by step.

● How to create a mailbox database?<Manager Right>
An account will be the membership of Local Administrators and Domain Organization Management Role(#1)
ScreenHunter_07or be the membership of Local Administrators and Domain Server Management Role(#2)
ScreenHunter_03
Create a mailbox database by EMCIn EMC, click Mailbox under Organization Configuration
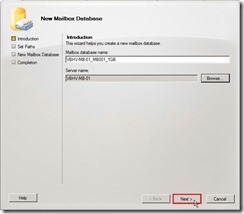
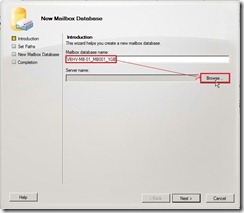
ScreenHunter_06 Aug. 29 17.31In the Action pane, click New Mailbox Database…ScreenHunter_07 Aug. 29 17.31In New Mailbox Database wizard, specify a name of Mailbox database next to click Browse… button
ScreenHunter_08 Aug. 29 17.35Select one server on which want to create the database next to click OK button
ScreenHunter_09 Aug. 29 17.37Click Next > button
ScreenHunter_10 Aug. 29 17.37The database path and log folder path will assign to the default path plus mailbox database name as C:\Program Files\Microsoft\Exchange Server\V14\<mailbox database name>
And the check box Mount this database will be enabled by default. If we don’t want to change anything or have already change it, please click Next > button to go ahead next step.
ScreenHunter_11 Aug. 29 17.40Click New button  to create the mailbox database now
ScreenHunter_12 Aug. 29 17.40Click Finish button to close the New Mailbox Database wizard
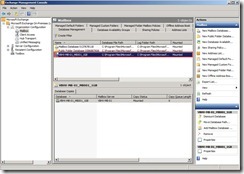
ScreenHunter_13 Aug. 29 17.41The new mailbox database will appears on the Database Management tab now
ScreenHunter_14 Aug. 29 17.42By default, the folders that hold the databases are stored in the folder path “C:\Program Files\Microsoft\Exchange Server\V14\<mailbox database name>
ScreenHunter_15

Create a mailbox database by PowerShell

Right-click Exchange Management Shell to select Run as administrator
ScreenHunter_16In EMS, use the New-MailboxDatabase cmdlet(#3) to create a mailbox database.
<Syntax>
New-MailboxDatabase [-Name <String>] -Server <ServerIdParameter> [-EdbFilePath <EdbFilePath>] [-LogFolderPath <NonRootLocalLongFullPath>]

ScreenHunter_17The new mailbox database will appears on the Database Management tab but Mounted status is Dismounted
ScreenHunter_18Due to the database never is mounted initially, both the database and its transaction don’t appear in the default folder.
ScreenHunter_19
● How to mount a mailbox database?
Mount a Database by EMC
In EMC, click Mailbox under Organization Configuration and Database Management tab , select a mailbox database that we want to mount next to click Mount Database in the Action pane
ScreenHunter_20Mount a Database by EMS
In EMS, use the Mount-Database cmdlet(#4) to mount a mailbox database
<Syntax>
mount-Database -Identity <DatabaseIdParameter>
ScreenHunter_21After mount a database by EMC or EMS, the status will change from Dismounted to Mounted.
ScreenHunter_22And the empty folder when initially create a database by EMS will exist the database and its transaction logs.
ScreenHunter_23
● How to dismount a mailbox database?Dismount a Database by EMCIn EMC, click Mailbox under Organization Configuration and Database Management tab , select a mailbox database that we want to mount next to click Dismount Database in the Action pane
ScreenHunter_08Dismount a Database by EMSIn EMS, use the Dismount-Database cmdlet(#5) to mount a mailbox database and type Y if we are prompted to confirm that you want to perform the action.
<Syntax>
dismount-Database -Identity <DatabaseIdParameter>
ScreenHunter_09After dismount a database by EMC or EMS, the status will change from Mounted to Dismounted.
ScreenHunter_10
Reference:
(#1) The Organization Management role can create and manage mailbox or public folder databases on any Mailbox server.
(#2) The Server Management role can create database on a specific server in an Exchange Organization.
(#3) Exchange 2010 New-MailboxDatabase cmdlet
(#4) Exchange 2010 Mount-Database cmdlet
(#5) Exchange 2010 Dismount-Database cmdlet


2012年9月1日 星期六

Exchange Server 2010 Database (part 1)

When the Exchange Database will be deployed, we have to know it have some significant change in the database architecture of Exchange Server 2010.
   ● Storage Group no longer exist --- that is the storage group integrates into the Exchange database.
   ● Database are no longer child objects of Exchange Mailbox servers --- that is database will be configured at the organizational level now.
   ● All databases require the unique names within an organization
ScreenHunter_01 Aug. 29 17.13
Before configure Exchange database, we need to know the database description or conception.
   ● Mailboxes and public folders store in Exchange databases
   ● Mailbox servers can contain both public folder and mailbox database
   ● Each database has a single set of transaction logs --- that is each database have its own set of transaction logs
   ● Transaction logs record changes as messages sent to or from the database
   ● Each individual database and its transaction logs are stored in the same folder by default --- that is a single folder by default holds a database and its transaction logs
   ● The location of a database and its transaction logs is the different with other one
  
In this folder locates database and its transaction logs, there is some types of files and its function is as follows:
   ● Checkpoint file (.chk)   ---> Determine which transactions in the current transaction log need to be committed to the database
   ● Current transaction log file (exx.log)   ---> Express which transactions are written
      If this file size reach 1 MB,Exchange Server 2010 close this log file next to rename it, and create a new current transaction log file.
   ● Closed transaction log file (.log)   ---> When a current transaction log size reaches 1 MB, it will be rename to Closed transaction log file and has a longer file name.
   ● Reversed transaction log file (.jrs)   ---> Play a emergency storage if the disk become full and a new transaction log cannot be created
      When the database take offline, any transactions cannot write into the current transaction log so that write to a reserved transaction log file that each file size is 1 MB.
   ● Temporary workspace file (<log prefix>tmp.log)   ---> It just only for the temporary workspace and its size cannot exceed 1 MB
   ● Exchange database file (.edb)   ---> Store content for mailbox and public folder database and the size limit is 64 TB
ScreenHunter_03 Aug. 29 17.23
And the above file number as Closed transaction log will depend on whether circular logging is enabled or disabled. Although you can enable circular logging to limit storage capacity, Microsoft still recommends that Exchange Server 2010 databases not be configured to use circular logging if we will plan to use the Volume Shadow Copy Service to enable third-party backup & restore operations.
ScreenHunter_04 Aug. 29 17.25
If circular logging is enabled, we need to notice
   ● When database is restored, the transaction logs in the same directory maybe deleted and only point-in-time recovery operation is possible.
   ● Incremental and differential backup operation is not permitted
   ● The restoration of individual databases will be prohibited if perform a backup or recovery operation     
Since 2010 Design by Davidwa
©Copyright Davidwa Inc. All rights reserved.