網頁

2012年6月10日 星期日

Install Microsoft Forefront TMG 2010 (part 3 of 3)

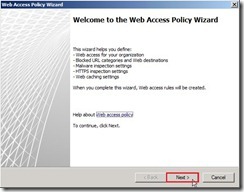
The previous article(part 2) has already finished the Getting Started Wizard. In the moment, it will continue to run the Web Access wizard after enable check box and click “Close” button.
ScreenHunter_06 Jun. 02 23.10In the beginning screen, please directly click “Next >” button if you clearly this wizard will helps you define something.
ScreenHunter_07 Jun. 02 23.12URL FilteringSelect “Yes, create a rule blocking the minimum recommended URL categories” option next to click “Next >” button
ScreenHunter_08 Jun. 02 23.12It will show a rule about Block access to these Web destinations. If no need to add other rule, please directly click “Next >” button
ScreenHunter_09 Jun. 02 23.12Malware and HTTPS Inspection
In Malware Inspection Settings, selecting “Yes, inspect Web content requested from the Internet” and “Block encrypted archives…”  for scanning HTTP content requested from Internet.
ScreenHunter_10 Jun. 02 23.13In HTTPS Inspection Settings, select “Allow users to establish HTTPS connections to Web sites” and “Inspect HTTPS traffic and validate HTTPS site certificates” option for let TMG can scan HTTPS traffic.
ScreenHunter_11 Jun. 02 23.13In HTTPS Inspection Preferences, select “No, do not notify users of HTTPS inspection” option if HTTPS traffic is inspected and “Use a certificate automatically generated by Forefront TMG” option for generating the HTTPS inspection certificate.
ScreenHunter_12 Jun. 02 23.14Web Caching
Due to this TMG is not a member of a Windows Active Directory Domain, it just only selection for us to choose “I will manually export and deploy the certificate” for deploying HTTPS inspection trusted root CA to the client computers.
Please click “Browse…” button for where is the exported certificate location.
ScreenHunter_13 Jun. 02 23.15Choose the right location as “My TMG 2010” and assign a file name as “https inspection trusted root CA” next to click “Save” button
ScreenHunter_15 Jun. 02 23.19Click “Next >” button if the certificate path and name is right.
ScreenHunter_16 Jun. 02 23.20In Web Cache Configuration, I want to enable the default Web caching rule so that need to create Cache Size by click “Cache Drives…” button
ScreenHunter_17 Jun. 02 23.20Select “Drive C:” and write down Maximum cache size(MB) “1024” next to click “Set” button
ScreenHunter_18 Jun. 02 23.21You will see Cache size has value “1024” now. Click “OK” to exist this setting.
ScreenHunter_19 Jun. 02 23.21Click “Next >” button to complete Web Cache Configuration.
ScreenHunter_20 Jun. 02 23.21Until now, we have already complete the Web Access Policy Wizard”.
ScreenHunter_21 Jun. 02 23.22Finally, we need to save changes and update the configuration by clicking “Apply” button.
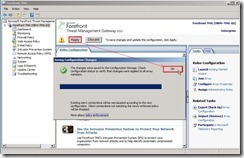
ScreenHunter_24 Jun. 02 23.46The Firewall Policy will define some policy based on the above setting now.
ScreenHunter_26 Jun. 02 23.47

<<< Install Microsoft Forefront TMG 2010 (part 2 of 3)

Install Microsoft Forefront TMG 2010 (part 1 of 3) >>>


2012年6月8日 星期五

Install Microsoft Forefront TMG 2010 (part 2 of 3)

Last article, I have already finish Software installation based on role selection and assign the internal network adapter. In the moment, I will continue to do the related configuration.

Network Settings
Click “Start” –> "Forefront TMG Management” to launch “Getting Started Wizard”
ScreenHunter_12 Jun. 01 18.46In Getting Started Wizard, click “Configure network settings”
ScreenHunter_02 Jun. 01 15.15Click “Next >” button
ScreenHunter_03 Jun. 01 15.21Select “Edge firewall” option next to click “Next >” button
ScreenHunter_06 Jun. 01 15.23Select the Internal network adapter next to click “Next >” button
ScreenHunter_07 Jun. 01 15.53Select one network adapter to connect to the Internet and “Obtain an IP address automatically” option next to click “Next >” button. In the moment,the alert message will show up and tell us the suggestion --- Use a static IP for a more secure configuration. Due to the selection is right for me, I decide to ignore this alert next to click “OK” button.
ScreenHunter_10 Jun. 01 15.57Click “Finish” button to complete the network setup wizard.
ScreenHunter_11 Jun. 01 15.57Now we will continue to configure system settings

System SettingsIn Getting Started Wizard, click “Configure network settings”
ScreenHunter_13 Jun. 01 20.38Click “Next >” button
ScreenHunter_14 Jun. 01 20.39Click “Next >” button if host identification is exact.
ScreenHunter_15 Jun. 01 20.40Click “Finish” button to complete the system setup wizard.
ScreenHunter_16 Jun. 01 20.44Now we will continue to define deployment options.

Define Deployment
In Getting Started Wizard, click “Define deployment options”ScreenHunter_17 Jun. 01 20.44click “Next >” button
ScreenHunter_18 Jun. 01 20.44Select “User the Microsoft Update service to check for updates” option next to click “Next >” button
ScreenHunter_19 Jun. 01 20.45In the NIS and Web Protection selection, it will depend on whether you need this function on TMG. In the moment, I will enable NIS and Web Protection by default next to click “Next >” button.
ScreenHunter_01 Jun. 02 23.00In the configuration of Signature Set Update and New Signature Set, it still depend on your decision. I still select recommended option next to click “Next >” button.
ScreenHunter_02 Jun. 02 23.08Select a feedback option next to click “Next >” button
ScreenHunter_03 Jun. 02 23.08Select your level of participation next to click “Next >” button
ScreenHunter_04 Jun. 02 23.09Click “Finish” button to complete the Deployment Wizard
ScreenHunter_05 Jun. 02 23.09Until now, we have already finish Getting Started Wizard.
ScreenHunter_06 Jun. 02 23.10In next article, we will continue to run the Web Access Wizard.

<<<  Install Microsoft Forefront TMG 2010 (part 1 of 3)

2012年6月3日 星期日

How to resolve F5 VPN Connection issue

As before, I have to do some homework at home in holiday so that I need to connect to the corporative environment by VPN. When I connect to VPN Server by IE and pass the authentication next to click “Access Network Resources” hyper-link, its error status is “Network Access Connection Device was not found”
ScreenHunter_02 Jun. 02 18.04In the moment, I still follow my troubleshooting rule --- Based on the error message to search the information by Google. Although I get some information to try and error as uninstall F5 VPN driver next to reinstall it again, the result still fail again and again.
ScreenHunter_03 Jun. 02 19.03Until I find out that VPN function is the relation with Remote Access Connection Manager Service by System Event Viewer.
ScreenHunter_02 Jun. 03 23.32So I decide to search the information based on this word. Finally, I get the answer to workaround this problem. That is Edit Registry Key Value!
In Registry Editor, Select “\HKEY_LOCAL_MACHINE\SYSTEM\CurrentControlSet\services\RasMan” –> Right-Click “DependOnService” –> Click “Modify…”
ScreenHunter_01 Jun. 03 17.58The Value Data will exist two strings --- Tapisrv and SstpSvc
ScreenHunter_02 Jun. 03 17.58Please delete “SstpSvc” next to reboot the computer.
ScreenHunter_04 Jun. 03 22.55Now you can connect to VPN Server and Remote Access Connection Manager Service will be started.
ScreenHunter_01 Jun. 03 23.04Although the above problem can be resolved, I still don’t know Why?
Maybe need to research F5 VPN theory if I can touch F5 device in the future.

2012年6月2日 星期六

Install Microsoft Forefront TMG 2010 (part 1 of 3)

To install TMG 2010 as install the Microsoft Product --- mount the DVD next to trigger execution file automatically that the installation guidance will show up. It is very friendly window to explain or guide you about “Before You Start”, “Prepare and Install”, “Additional Options” scenario. In the moment, I have installed Windows Update with up to date into my Server. So I will follow up this flow --- first decide to run Preparation Tool next to Run Installation Wizard.

When click “Run Preparation Tool”, the Forefront TMG Preparation Tool wizard will show up.
ScreenHunter_02 May. 25 21.26Click “Next >” button
ScreenHunter_01 May. 28 11.43Enable “I accept the terms of the License Agreements” check box next to click “Next >” button
ScreenHunter_02 May. 28 11.43Select “Forefront TMG services and Management” option next to click “Next >” button
ScreenHunter_03 May. 28 11.43Enable “Launch Forefront TMG Installation Wizard” check box next to “Finish” button
ScreenHunter_04 May. 28 11.56So does that the Forefront TMG Enterprise Installation Wizard will show up automatically and click “Next >” button to go the next process.
ScreenHunter_01 May. 29 15.44(The above result is the same as execute executable file in TMG 2010 DVD again to select “Run Installation Wizard”.)
ScreenHunter_03 May. 25 21.27Select “I accept the terms in the license agreement” option next to click “Next >” button
ScreenHunter_02 May. 29 20.38Enter some information as User Name、Organization、Product Serial Number next to click “Next >” button
ScreenHunter_01 May. 30 18.25Select Installation path for Forefront TMG next to click “Next >” button
ScreenHunter_02 May. 30 18.31Click “Add…” button to specify the internal network address range
ScreenHunter_03 May. 30 19.19Click “Add Adapter…” button
ScreenHunter_04 May. 30 20.09Select one network adapter for Internal range next to click “OK” button
ScreenHunter_06 May. 30 20.27If the IP address ranges have already added into this network, please click “OK” button to return to the Define Internal Network windows.
ScreenHunter_01 May. 31 17.20So does that the Internal Network Address Ranges will show the defined value. If it is no any problem, click “Next >” button.
ScreenHunter_02 May. 31 17.21This windows just notify you the some Services will be restarted during the installation. Please directly ignore this message to click “Next >” button.
ScreenHunter_03 May. 31 17.21Click “Install” button to begin the installation.
ScreenHunter_04 May. 31 17.21The Installation Wizard is progressing now.
ScreenHunter_05 May. 31 17.51Click “Finish” button to exit the wizard. If you want to continue to do next action, please enable “Launch Forefront TMG Management when the wizard closes” check box.
ScreenHunter_06 May. 31 18.34Until now, we just install the initial software installation and basic internal selection. In next article, I will introduce the three steps --- Configure network settings, Configure system settings, Define deployment option.

2012年5月27日 星期日

老師,我錯了嗎 !?

一如往常瀏覽網路上今日新聞,無意間發現一則引我注意的事件:〝學生對老師飯菜吐口水〞的報導!在老師PO文的字句中 "自己也是人生父母養,身為導師的尊嚴,是否在一口又一口的飯被消滅", 那樣字裡行間充滿著 "心境無奈、教學失敗、自尊被踐踏與蹂躪"的意喻,真是令人覺得無言!

或許絕大部分人看了這則新聞,會覺得應該是小孩子不懂事、鬧著玩的心態一笑至之;或許有另類團體又有突發奇想的看法:小孩無罪、大人自己也該檢討的論述.  但不知若此事變成 〝老師對學生飯菜吐口水〞,大家的看法又是如何?

每當學校有老師處罰學生,社會上總是用放大鏡來檢視老師,我想無形中會讓老師倍感壓力,以至於日後管教學生,寧可選擇漠視與忽視,也不願多花心思來對待學生,畢竟管教這把尺的拿捏總是見仁見智,沒有也絕不會有公正的標準.

當然,老師們也像一個團體社群,也會有優、劣之區別;也是會有私心或分寸拿捏不準的時候,畢竟他們也都是人. 就如同現行社會,也有好人、壞人之別,但好、壞衡量的標準也是用人來判斷. 除非違反道德與法律上的行為才會有明確的區別,否則單純用事的對與錯來判斷,多少也會因人而異. 就如同政治上在解讀 "一國兩制 或 一個中國", 立場或觀念不同,所看的角度與論述也是不一樣的.但若能聽聽每個人的說法,多少論點也是滿認同的.

我想:時間久了,過陣子大家也就漸漸淡忘了;但對於受傷與受害的當事人,或許這件事就永遠烙印在自己的心理,成為心中永遠不可磨滅的惡夢與痛!畢竟,大人或小孩都是人,都只是個平凡人,沒有任何區別.但大人犯錯與小孩犯錯,我想世俗的看待多少會有些不一樣.

真擔憂我們的下一代,用名與利來評鑑與衡量一切,忽視我們最基本的倫理與道德,造成日後不可一世的性格. 或許這是未來普羅眾世所有人的想法, 以我們過去年代的思維來看待當今,多少有些落伍了吧!

果然是無言的!
Since 2010 Design by Davidwa
©Copyright Davidwa Inc. All rights reserved.