網頁

2012年2月20日 星期一

Why Microsoft Loopback Adapter cannot work?

Recently, I am studying to realize system center 2012 product. Specially,the SCVMM 2012 create cloud environment based on physical network card. Otherwise, you just can create one private cloud due to the PC has only one network card by default.

How to resolve it? to buy "new" network card?
I don't want to purchase it by my memory because there is a method to save cost. That is to use Microsoft Loopback Adapter!

How to install it? It is very simple to do it on Windows Server 2008/R2/7.

  • In Computer Management, click "Device Manger" --> "Network adapters" --> "Action" --> "Add legacy hardware"


  •  Click "Next > " button


  •  Select "Install the hardware that ..." option next to click "Next > " button


  •  Select "Network adapters" next to click "Next > "button


  •  Select "Microsoft " in Manufacturer and "Microsoft Loopback Adapter" in Network Adapter, next to click "Next > " button


  •  Click "Next > " button


  •  Click "Finish" button to complete this Add Hardware Wizard.


  •  Now you will see it exist another network card --- "Microsoft Loopback Adapter"


If you think the network function is normal, it will be wrong.
When you open this property of network card, the speed is 10.0 Mbps and Sent/Received traffic almost is very small. (Even Received package equal 0)
Why?
Because the function of Microsoft Loopback Adapter is limited by defualt!

How to open this function?
Open "Command Prompt" by "Run as administrator"
 To realize what is the loopback adapter name as "Adatum RD"
 Do the following command to open receive/send function.


After finishing the above activity, the speed and sent/received traffic is normal now.

2012年2月18日 星期六

Build Windows Failover Cluster with Microsoft iSCSI Target 3.3 (Part-4)

(8).Install Failover Clustering feature

  • In Server Manager, click "Features" --> Add Features


  •  Enable check box "Failover Clustering" next to click "Next > "


  •  Click "Install" button


  •  Click "Close" button


(9).Validate a Configuration

  • Click "Start" --> "Administrative Tools" --> "Failover Cluster Manager"


  •  Click "Validate a Configuration ..."


  •  Click "Next > " button


  •  Click "Browse ..." button


  • Write down the two node name as TEST-SQL-01 and TEST-SQL-02 for installing SQL Server Cluster later


  •  Return to the original "Validate a Configuration Wizard" next to click "Next > " button


  •  Select "Run all tests" option next to click "Next >" button


  •  Click "Next > " button

  • Click "View Report..." button to realize whether has any error message.

  • If no any error, click "Next > button to finish Validate a Configuration activity.


(10).Create a Cluster

  • In Failover Cluster Manager, click "Create a Cluster ..."


  •  Click "Next > " button


  •  Enter Server Name as the screen next to click "Next > " button


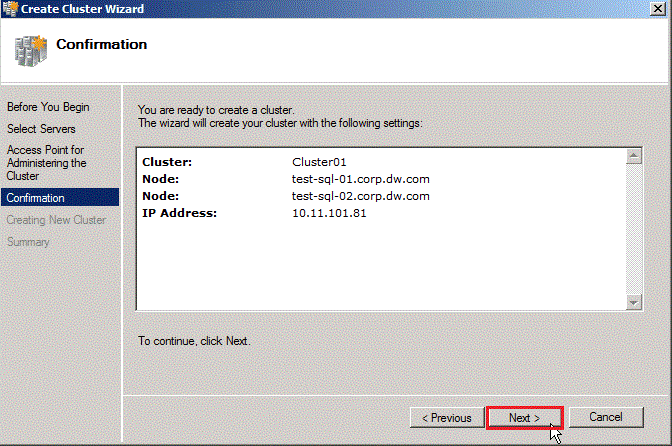
  •  Write down Cluster Name as "Cluster01" and IP address, next to click "Next > button


  •  Click "Next > " button


  •   Click "View Report" button to realize whether has any error message.


  •  If no any error, click "Finish' button to complete "Create Cluster Wizard" 


  •  Now you can see two cluster node is created


Until now, we also finish the "Creating cluster failover with iSCSI Target 3.3" procedure.
We can use it add other application with cluster function as File,Printer , Terminal,NLB,SQL,Exchange and so on.

2012年2月12日 星期日

Build Windows Failover Cluster with Microsoft iSCSI Target 3.3 (Part-3)

(5).Create the Virtual Disk in iSCSI Target

  • Right-Click this new iSCSI Target Name next to click "Create Virtual Disk for iSCSI Target"


  •  Click "Next > " button


  •  Click "Browse..." button


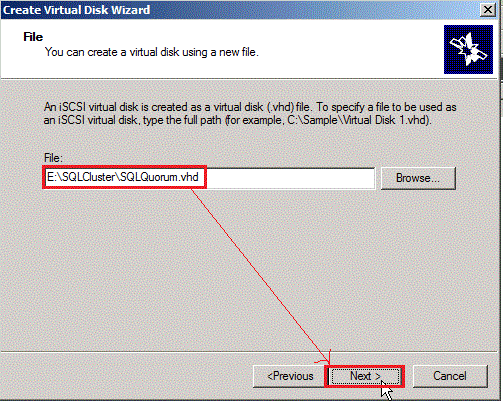
  •  Select a path and key in virtual disk name as "E:\SQLCluster\SQLQuortum.vhd" next to click "Next > " button


  •  Key in size of virtual disk next to click "Next > " button


  •  Write down virtual disk description if need next to click "Next > " button


  •  Click "Finish" button to complete the Create virtual Disk Wizard


  • Return to iSCSI Target management,you will see a new virtual disk now.


  • Repeat the above steps to create another disks


  •  Finally, there is three virtual disks created on iSCSI Target.


(6).Mount the iSCSI LUN in iSCSI initiator

  • In each node, click "Start" --> "Administrative Tools" --> "iSCSI Initiator"


  • Key in the iSCSI Target 's IP as "10.11.106.21" again next to click "Quick Connect..." button


  • You will see the message as the iSCSI Target is connected by iSCSI initiator and Logon success. So click "Done" button.


  •  That is Discovered targets can be found now.


  •  In "Favorite Targets" tab, you will see iSCSI Target IQN.


  •  In "Volumes and Devices",click "Auto Configure" button


  •  Now, it will show three iSCSI LUN and has already been mounted.


(7).Mount the Virtual Disk in each node

  • In each node, click "Start" --> "Administrative Tools" --> "Computer Management"


  • Click "Disk Management", there is three unknown and offline disks.


  • Right-Click each disk to click "Online" 


  •  Select each disk to enable "MBR" check box if disk size less than 2TB next to click "OK" button


  •  After the above activity, three disks have already been online and status is basic. Next step,we will begin to format these disks. Please right-click each disk to choose "New Simple Volumes..."


  •  Click "Next > " button


  •  Click "Next > " button


  •  Assign drive letter in each disk next to click "Next > " button


  •  Write down "Volume label" and enable "Perform a quick format", next to click "Next > " button


  •  Click "Finish" button to complete the New Simple Volume Wizard.


  •  Now you will see all disks have already been mounted.


COMMENT (I):

When all disks are mounted successfully,you can open iSCSI Initiator again next to click "Auto Configure" button


You will see the Volume Name is replaced with Drive Letter now


COMMENT (II):
 If you find the drive letter is not the same as first node one, please remember to change it before create cluster failover mechanism.
Otherwise, the cluster failover will fail
Since 2010 Design by Davidwa
©Copyright Davidwa Inc. All rights reserved.