網頁

2012年4月19日 星期四

Lookup Transformation in SSIS (Part-1)

When I design a ETL package for importing Oracle some data to SQL Server by SQL command, that is “Select data from Oracle in the time duration”, it is successful for me to do it.
Data Source ViewScreenHunter_02 Apr. 02 11.56
Execute Debug mode and it is successfulScreenHunter_145 Mar. 28 20.58
If repeat the above step “start debugging”, the same data will be import again. That is duplicated data in database now.
View Imported data by SQL commandScreenHunter_03 Apr. 02 12.04
How to resolve this problem? I want
"If Imported data is the same as SQL data and one field is corrected, this record will overwrite the SQL data.”
"If imported data is the same as SQL data but no field is changed,this record will be ignored.”
"If imported data is new,the record will insert directly it into SQL database.”
For the above target, I will correct the original SSIS Package for satisfying the necessity.

(1).Add "Lookup" Data Flow Transformation
In Solution Explorer, select the original SSIS Package as "Package Lookup.dtsx" next to click "Data Flow" tab.
ScreenHunter_27 Apr. 09 12.23
Right-Click the green line between "Data Conversion" and "SQL Server Destination" next to select "Delete" in menu.
ScreenHunter_28 Apr. 09 12.24
Click the Data Flow Transformation as "Lookup" in the left panel
ScreenHunter_29 Apr. 09 12.25
Drag & Paste it to the empty space of Data Flow Task.
ScreenHunter_30 Apr. 09 12.25
Click green arrow in Data Conversion
ScreenHunter_31 Apr. 09 12.25
Drag & Paste it to Lookup
ScreenHunter_32 Apr. 09 12.26
So does that it will create a green line between Data Conversion and Lookup
ScreenHunter_34 Apr. 09 12.26
Click a green arrow in Lookup
ScreenHunter_35 Apr. 09 12.27
Drag & Paste it to  SQL Server Destination
ScreenHunter_36 Apr. 09 12.27
When you release mouse, the "Input Output Selection" Windows will show up.
ScreenHunter_37 Apr. 09 12.27
In Output field, select "Lookup No Match Output"
ScreenHunter_38 Apr. 09 12.27
Click OK button
ScreenHunter_39 Apr. 09 12.27
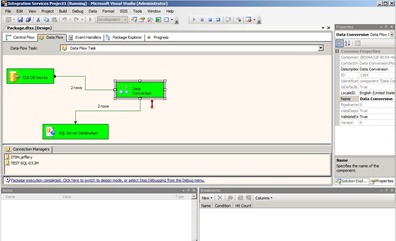
The Data Flow will be built now.
ScreenHunter_80 Apr. 09 14.31

2012年4月15日 星期日

P2V for Boot VHD

I have already install a Windows 7 x64 version on Notebook and divided some partition into locate OS and Data.
ScreenHunter_01 Apr. 15 15.34
For building a VHD and boot it, let me install any program or software on VHD for testing. If go wrong or testing fail, I don’t worry it will influence my workstation because I can give up this VHD and duplicate it again. It will be very convenient for me to do any business testing.

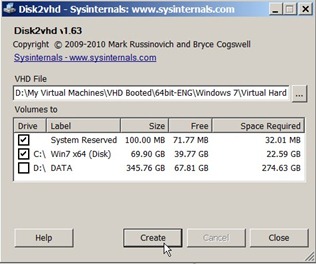
Microsoft Disk2vhd is good utility for P2V and its operation is very simple and straight. In GUI, select which drive you want to convert to VHD.
For my sample, I just want to convert the system and drive c partition.
ScreenHunter_03 Apr. 15 15.46
After complete P2V conversion, please remember to attach VHD in Disk Manager.
ScreenHunter_04 Apr. 15 15.56
Next to delete all volumes except for the system and drive c partition.
ScreenHunter_05 Apr. 15 15.58
So do that we will keep the right disk, not include the other garbage. That is we will do next action to delete unwanted volume or partition by Vhd Resizer tool.
ScreenHunter_06 Apr. 15 16.08
After complete Resizer job, please attach VHD file again for extend volume “Drive F” from 69.90 GB to 79.90 GB.
ScreenHunter_07 Apr. 15 16.11

ScreenHunter_08 Apr. 15 16.17

After detach VHD, we will add VHD entry in boot menu by BCDEdit tool in command prompt Run As administrator.

Once restart the computer, we will see additional entry in Boot Menu and can boot to “Windows 7 Enterprise x64 (VHD)” environment now.

But it is very strange that VHD occupy Drive E, not Drive C !
When I verify the environment by "set" command, I find out the big problem --- the program execution still use Drive C file (Physical Disk), not use Drive E (VHD).
That is "if you want to install new application, the installation location will put into Drive C (Physical Disk), not Drive E (VHD).

I don't know how to resolve it even though I try to fix it by repair CD or sysprep. I just know it will success if  install the pure Windows 7 into attached VHD by booted CD. Maybe the above step is not compatible with Windows 7 installation process, I think.

During some days, I find out how to resolve this problem and let the VM can be booted normally!

To install Virtualbox on the converted machine, the Virtualbox Manager is opened next to create a new VM but mount the existing VHD file. If it is boot normally, please firstly uninstall anti-virus or spam next to execute Sysprep on VM.
When the above process complete, the VM's OS will be shutdown automatically.
Please close Virtualbox Manager next to add it to Boot Menu and restart OS.
So does that this converted VM will be booted now.

Summary:
Based on my experience, I write down the related procedure as follows:
(1).P2V by Microsoft disk2vhd 1.4 and verify volume type=NTFS by disk manager
(2).Shrink & delete the partition to keep the right volume
(3).Resize VHD file by VHD Resizer 1.0.42 and verify disk type=NTFS by disk manager
(4).VHD disk type = fixed, not use Dynamic
(5).Create new VM but mount the converted VHD on Virtualbox or Hyper-V
(6).In VM of Virtualbox or Hyper-V, uninstall anti-virus/spam next to execute Sysprep
(7).Add VHD to Boot Menu by BCDEdit
Hope it can help you in the future!

Comment:
At first, I try to use disk2vhd for P2V next to resize VHD by vhd Resizer 1.0.42 but the result is "VHD Volume Type = RAW, not NTFS".
This is why I need to write down Tool Version on this article!

Clone Hyper-V VM with different SID

In the corporative virtualization, we will deploy Microsoft VM to production environment because its cost is less than VMWare product. For realizing Microsoft VM, I will build a lab to test the related status. It includes clone VM mechanism after installing OS and application into physical equipment.

When I finish converting physical machine to virtual machine by Microsoft Vhd2Disk tool and boot it by Hyper-V, I find out that exist the garbage partition “Drive E” because I just want to convert OS partition “Drive C” to VM.
ScreenHunter_25 Apr. 11 17.08

So next action need to find a solution to delete this partition, I think.
I search some solution by Google and find out a tool can help me to finish this target. What’s Tool? That is “VhdResizer”.

It is very simple tool to select source vhd file, assign destination vhd file,Type and new size next to execute it by pressing resize” button. But it is very important that New Size need to large than Min Size, cannot set equal to Min Size.
ScreenHunter_31 Apr. 11 19.36

After Shrinking the garbage partition and creating a new VM to mount new vhd, the partition will add 10 GB unused space.
ScreenHunter_05 Apr. 12 18.02

Now we need to do “Extend Volume” to expand Drive C disk.
ScreenHunter_06 Apr. 12 18.02

So do that we will extend disk partition to full one.
ScreenHunter_10 Apr. 12 18.03

In the moment, this disk will has one partition.
Next action, I need to clone this VM for avoiding duplicated SID so that the original and cloned VM can boot normally at the same time.
How to do it?
I ever try to do as following
(1). Sysprep and Shutdown VM –> Export & Import by Hyper-V Manager
(2). Sysprep and Shutdown VM –> Copy VHD file to another location –> Create new VM and choose this Copy VHD file.
(3). Sysprep and Shutdown VM –> Clone VM by SCVMM 2012
ScreenHunter_58 Apr. 11 20.30
But the result fail and OS always restart repeatedly.
ScreenHunter_02 Apr. 13 16.37
I don’t know how to resolve this problem because I ever try to repair it by Windows 7 source CD. I don’t understand what happen because this method get from Google Search.

Based on this error message to search knowledge by Google, I find out a forum and it said maybe the anti-virus influence this status. Of course, maybe a registry key is larger than 8 KB according to Microsoft KB981542.
ScreenHunter_23 Apr. 14 23.48
I decide to try to uninstall anti-virus software from VM next to do Sysprep and clone VM by SCVMM 2012 manager. If the procedure fail, it is another choice to install Microsoft hotfix.
The result is lucky for me. The Sysprep function can work and OS boot normally.

Finally, how to prove the SID is different between VMs?
To download PsGetsid from Microsoft next to execute & compare it on prompt command of each VM.
ScreenHunter_04 Apr. 12 14.23
So do that you will know whether VM based on different ID can be booted together.

SID before executing SysprepScreenHunter_01 Apr. 13 15.47

SID after executing Sysprep
ScreenHunter_38 Apr. 15 00.30

2012年4月8日 星期日

Install SQL Server 2008 R2 Cluster (part 4 of 4)

(6). Add second Node to SQL Cluster
  • Switch to the second node next to execute “SQL Server 2008 R2” installation program, the SQL Server Installation Center will show up.
    Click “Installation” in left menu --> “Add node to a SQL Server failover cluster”
ScreenHunter_42 Feb. 09 17.29
  • Click “OK” button if Setup doesn’t identify any problem.
ScreenHunter_43 Feb. 09 17.47
  • Enter the product key next to click “Next > “ button
ScreenHunter_44 Feb. 09 17.50
  • Enable “I accept the license terms” check box next to click “Next > “ button
ScreenHunter_45 Feb. 09 17.50
  • Click “Install” button
ScreenHunter_46 Feb. 09 17.50
  • Click “Next > ” button and ignore error message.
ScreenHunter_47 Feb. 09 17.59
  • Select SQL Server instance name as “MSSQLSERVER” that is which instance you wan to add.
    If it is right choice, click “Next > “ button to go through next step.
ScreenHunter_48 Feb. 09 18.00
  • Browse a Domain Account as “CORP\sqlservice” and key in its password for SQL Server Agent/Database Engine/Analysis Services/Reporting Services next to click “Next > “ button
ScreenHunter_50 Feb. 09 18.04
  • Click “Next > “ button
ScreenHunter_51 Feb. 09 18.04
  • Click “Next > “ button
ScreenHunter_52 Feb. 09 18.04
  • Click “Install” button if the summary is as your willing
ScreenHunter_53 Feb. 09 18.04
  • Click “Close” button if get the successful message as “Your SQL Server 2008 R2 failover cluster installation is complete”
ScreenHunter_55 Feb. 09 18.30
(7).Verify SQL Cluster Failover
  • Click "Start" --> "Administrative Tools" --> "Failover Cluster Manager"ScreenHunter_56 Feb. 09 18.33
  • In Failover Cluster Manager, right-click “SQL Server (MSSQKSERVER) so that one menu will show up.Select “Move the service or application to another node” next to click “Move to node TEST-SQL-02”ScreenHunter_57 Feb. 09 18.42
  • A confirm windows show up and click “Move SQL Server (MSSQLSERVER) to TEST-SQL-02” if it is right option.ScreenHunter_58 Feb. 09 18.42
  • We can see “TEST-SQL-02” is current owner and SQL status is normal now.ScreenHunter_59 Feb. 09 18.43
Until now, we have already finished the SQL Cluster Installation process.
Since 2010 Design by Davidwa
©Copyright Davidwa Inc. All rights reserved.