(5).Create the Virtual Disk in iSCSI Target
- Right-Click this new iSCSI Target Name next to click "Create Virtual Disk for iSCSI Target"
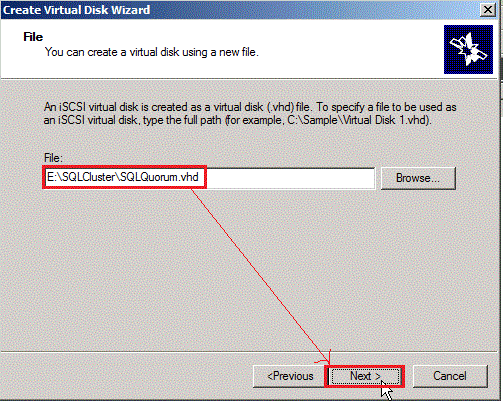
- Select a path and key in virtual disk name as "E:\SQLCluster\SQLQuortum.vhd" next to click "Next > " button
- Key in size of virtual disk next to click "Next > " button
- Write down virtual disk description if need next to click "Next > " button
- Click "Finish" button to complete the Create virtual Disk Wizard
- Return to iSCSI Target management,you will see a new virtual disk now.
- Repeat the above steps to create another disks
- Finally, there is three virtual disks created on iSCSI Target.
(6).Mount the iSCSI LUN in iSCSI initiator
- In each node, click "Start" --> "Administrative Tools" --> "iSCSI Initiator"
- Key in the iSCSI Target 's IP as "10.11.106.21" again next to click "Quick Connect..." button
- You will see the message as the iSCSI Target is connected by iSCSI initiator and Logon success. So click "Done" button.
- That is Discovered targets can be found now.
- In "Favorite Targets" tab, you will see iSCSI Target IQN.
- In "Volumes and Devices",click "Auto Configure" button
- Now, it will show three iSCSI LUN and has already been mounted.
(7).Mount the Virtual Disk in each node
- In each node, click "Start" --> "Administrative Tools" --> "Computer Management"
- Click "Disk Management", there is three unknown and offline disks.
- Right-Click each disk to click "Online"
- Select each disk to enable "MBR" check box if disk size less than 2TB next to click "OK" button
- After the above activity, three disks have already been online and status is basic. Next step,we will begin to format these disks. Please right-click each disk to choose "New Simple Volumes..."
- Assign drive letter in each disk next to click "Next > " button
- Write down "Volume label" and enable "Perform a quick format", next to click "Next > " button
- Click "Finish" button to complete the New Simple Volume Wizard.
- Now you will see all disks have already been mounted.
COMMENT (I):
When all disks are mounted successfully,you can open iSCSI Initiator again next to click "Auto Configure" button
You will see the Volume Name is replaced with Drive Letter now
COMMENT (II):
If you find the drive letter is not the same as first node one, please remember to change it before create cluster failover mechanism.
Otherwise, the cluster failover will fail
(3).Configure iSCSI Initiator in two node
- Click "Start" --> "Administrative Tools" --> "iSCSI Initiator"
- Key in "10.11.106.21" point to iSCSI Target IP address next to click "Quick Connect..." button
- In [Discovery] tab, you will see some information for Target.
(4).Configure iSCSI Target
- Click "Start" --> "Administrative Tools" --> "Microsoft iSCSI Software Target"
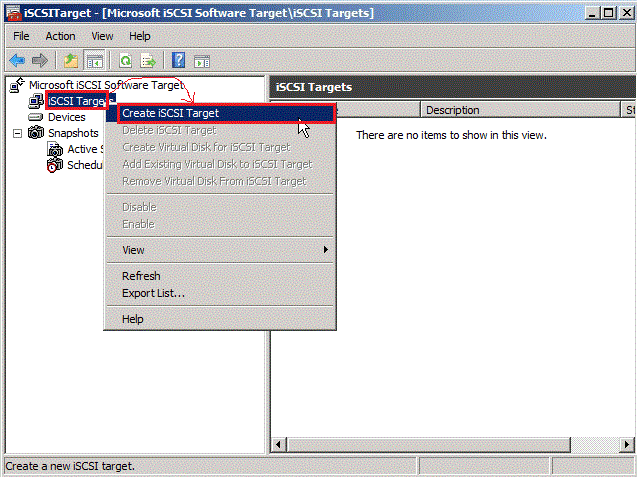
- Right Click iSCSI Target" next to click "Create iSCSI Target" in menu
- Key in iSCSI Target name & Description next to click "Next> " button
- Click "Advanced..." button
- Select "IQN" in Identifier Type next to click "Browse..." button
- Select two IQN next to click "OK" button
- It show up the message and ask you whether will select multiple initiator besides use in a cluster or a SAN file system. Due to we will create cluster failover environment later,please directly click "Yes" button
- After finish "Advanced.." setting,we will will continue to next step.So click "Next > " button
- Click "Finish" button to end up the process --- Create iSCSI Target Wizard.
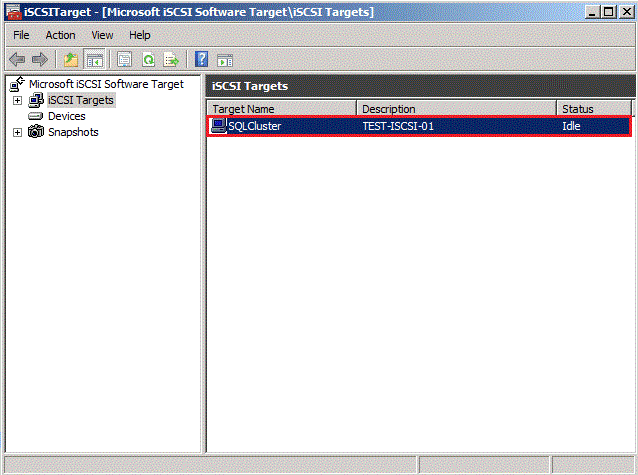
- A new iSCSI Target is created now.
Although Microsoft has already announced Windows iSCSI Target software or product for a long time,it still need to charge cost or buy OEM hardware to get this function.
Until Microsoft iSCSI Software Target 3.3 release, it will be free but only install it on Windows Server 2008 R2 x64 environment.
It is enough for me to use this software,I mean. Although it never exist Data Deduplication as Starwins free version by default, I know Windows Server 8 will be built-in this function as iSCSI target and Deduplication by default. This is why I need to realize Microsoft iSCSI software target now.
In my lab, I will build a iSCSI Storage by Microsoft iSCSI Target and two Windows Server node for Cluster environment. The following series articles will introduce "How to mount iSCSI LUN on two cluster node?"
(1).Install iSCSI Target on Windows Server 2008 R2
- Download Microsoft iSCSI Software Target 3.3 from Microsoft Official Web site
- Execute this iSCSITarget33-DFE.exe to extract all files to the special folder as C:\MySource. When you open index.html by I.E.
- You can install the software by clicking the hyper-link as "iSCSI Software Target (X64)"
- Or install it by right-click "iscsitarget_public.msi" under the folder "C:\My Source\x64\".
- Enable check box about "I accept the terms in the License Agreement"next to click "Next" button
- Choose the installed path next to click "Next" button
- Click "Install" button to begin to install this software now.
- Click "Finish" button to exit the software installation.
- Click "Start" --> "Administrative Tools" --> "Microsoft iSCSI Software Target"
- If you can open iSCSITarget Management, the installation process is successful now.
(2).Open firewall rule for iSCSI Target
- Click "Start" --> "Control Panel"
- Click "check firewall status"
- Click "Allow a program or future go through firewall"
- Enable check box about "Microsoft iSCSI Software Target" and Domain or Home/Work or Public environment.
In Windows 7, the system built-in burn CD or DVD function after installing this operation system. But this function is disabled in Windows Server 2008 or 2008 R2 by default.
One day, I need to enable it for burning some data but doesn't install another software. How to do it?
- In Server Manager, click "Features" and "Add Features"
- Click "Desktop Experience"
- It will pop-up "Add Feature Wizard" windows and click "Add Required Feature" button.
- Finally, the message tell you the function will be enabled after reboot. Please click "Close" button next to reboot this Server.
- After logon Server,you will see the message about Installation Results succeed.
Now you burn CD or DVD by right-click folder or file in explore.
It is very simple step to open this function!
Since 2010 Design by Davidwa
©Copyright Davidwa Inc. All rights reserved.